Linux

Nagios 4.3.4: Adding graphs to Nagios Core.

Nagios Graphs

In this article we will be adding graphs to the Nagios server that will allow monitoring the services and hosts performance in the past, these graphs can be monitored for Day, Week, Month and Yearly

Assuming that you have already configured the Nagios 4.3.4 Core Server if not follow this link to configure

Create a folder for the source:

# mkdir -p /usr/local/src/nagiosgraph/
# cd /usr/local/src/nagiosgraph/

Download the latest version:

# wget http://downloads.sourceforge.net/project/nagiosgraph/nagiosgraph/1.5.2/nagiosgraph-1.5.2.tar.gz
# tar -xf nagiosgraph-1.5.2.tar.gz
# cd nagiosgraph-1.5.2

Installing the dependencies for Nagios Graphs in the Nagios server

# yum install perl-rrd* perl-GD* perl-CPAN

Configure Nagios::Config: FAIL

# perl -MCPAN -e shell
Press enter for all the prompts till we get cpan[1]> prompt
cpan[1]> install Nagios::Config
Press enter for all the prompts till we get cpan[1]> prompt
type \quit to get into shell prompt

Check that we have all the dependencies installed:

# ./install.pl --check-prereq
Output:
checking required PERL modules
  Carp...1.29
  CGI...3.64
  Data::Dumper...2.145
  Digest::MD5...2.52
  File::Basename...2.84
  File::Find...1.23
  MIME::Base64...3.13
  POSIX...1.32
  RRDs...1.4007
  Time::HiRes...1.9725
checking optional PERL modules  GD...2.46
checking nagios installation
  found nagios exectuable at /usr/local/nagios/bin/nagios
checking web server installation
  found apache executable at /usr/sbin/apache2
  found apache init script at /etc/init.d/apache2

Start the installation:

# ./install.pl --layout standalone --prefix /usr/local/nagiosgraph
Give the default answer to all the questions except the below one:
Modify the Nagios configuration? [n] y
Path of Nagios commands file? /usr/local/nagios/etc/objects/commands.cfg
Modify the Apache configuration? [n] y

Create the Apache configuration file at this location “/usr/local/nagiosgraph/etc/”,  so that we can get the Nagios graphs from the URL, below are the commands to create the file and edit with the below contents.

# touch /usr/local/nagiosgraph/etc/nagiosgraph-apache.conf
# vi /usr/local/nagiosgraph/etc/nagiosgraph-apache.conf

Add the following to the file:

# enable nagiosgraph CGI scripts
ScriptAlias /nagiosgraph/cgi-bin "/usr/local/nagiosgraph/cgi"
<Directory "/usr/local/nagiosgraph/cgi">
     Options ExecCGI
     AllowOverride None
     Require all granted
</Directory>
# enable nagiosgraph CSS and JavaScript
Alias /nagiosgraph "/usr/local/nagiosgraph/share"
<Directory "/usr/local/nagiosgraph/share">
    Options None
    AllowOverride None
    Require all granted
</Directory>

Restart Nagios and Apache:

# service nagios restart
# service apache2 restart

You can now view the graphs at https://you-ip-address/nagiosgraph/cgi-bin/show.cgi.

We can integrate these graphs into Nagios with a little hack. Nagios supports notes_url and action_url. These can be put per host/service in the Nagios config and allow for a link to an internal knowledge base article or a procedure page or whatever for that host.

We can also place a javascript URL to the graphs there. Place this inside any service check: in windows.cfg, localhost.cfg, services.cfg files which are located in /usr/local/nagios/etc folder

action_url      /nagiosgraph/cgi-bin/show.cgi?host=$HOSTNAME
 
amp;service=$SERVICEDESC
 
amp;geom=1000x200' onMouseOver='showGraphPopup(this)' onMouseOut='hideGraphPopup()' rel='/nagiosgraph/cgi-bin/showgraph.cgi?host=$HOSTNAME
 
amp;service=$SERVICEDESC$

For example, the Load of the system:

# vi /usr/local/nagios/etc/objects/localhost.cfg
define service {
        use                              local-service
        host_name                  localhost
        service_description    Load
        check_command           check_local_load!5.0,4.0,3.0!10.0,6.0,4.0
        action_url              /nagiosgraph/cgi-bin/show.cgi?host=$HOSTNAME
 
amp;service=$SERVICEDESC
 
amp;geom=1000x200' onMouseOver='showGraphPopup(this)' onMouseOut='hideGraphPopup()' rel='/nagiosgraph/cgi-bin/showgraph.cgi?host=$HOSTNAME
 
amp;service=$SERVICEDESC$ }

For the ping check you can show both RTA and packet loss:

define service {
        use                     local-service
        host_name               localhost
        service_description     PING
        check_command           check_ping!100.0,20%!500.0,60%
        action_url              /nagiosgraph/cgi-bin/show.cgi?host=$HOSTNAME
 
amp;service=$SERVICEDESC
 
amp;db=pl,data&db=pl,warn&db=pl,crit&geom=1000x200' onMouseOver='showGraphPopup(this)' onMouseOut='hideGraphPopup()' rel='/nagiosgraph/cgi-bin/showgraph.cgi?host=$HOSTNAME
 
amp;service=$SERVICEDESC
 
amp;db=pl,data&db=pl,warn&db=pl,crit }

We need to include the Nagios Graph Javascript in Nagios to make sure the mouseover works. Edit or create the following file:

# vi /usr/local/nagios/share/ssi/common-header.ssi

Place the following in there:

/nagiosgraph/nagiosgraph.js

Now save and reload Nagios:

# service nagios restart


Keywords: Nagios, Monitoring, Linux host, Adding Linux host, Nagios Graph, MRTG Graphs, Nagios MRTG Graphs

How to install Nagios Core 4.3.4 on CentOS 7.x/8.x

In this article, we will learn about how to install Nagios Core 4.3.3& Nagios Core plugins versions 2.2.1.

Nagios Core 4.3.3 is an Open source monitoring application tool that will monitor the Servers, Network firewalls, switches, and printers which also send notifications for the hosts, services and send notifications for the warning, critical levels send a notification once the services are hosts are recovered.

Nagios also provides the information on s single web interface and sends the notifications whenever there is a threshold according to the configuration we did for CPU utilization, Disk utilization which also supports for no of ports like HTTP, SNMP, ICMP, FTP, SSH, SMTP, POP3.

Installing the dependencies.

Before we proceed further we will first install all the dependencies packages like PHP, Apache, and other packages required to run the Nagios Core 4.2.1

[root@localhost ~]# yum install httpd php gcc glibc glibc-comman gd gd-devel make net-snmp unzip –y
Output:
Loaded plugins: fastestmirror
Loading mirror speeds from cached hostfile
* base: ftp.iitm.ac.in
* extras: ftp.iitm.ac.in
* updates: mirrors.nhanhoa.com
Package httpd-2.4.6-67.el7.centos.5.x86_64 already installed and latest version
Package php-5.4.16-42.el7.x86_64 already installed and latest version
Package gcc-4.8.5-16.el7.x86_64 already installed and latest version
Package glibc-2.17-196.el7.x86_64 already installed and latest version
No package glibc-comman available.
Package gd-2.0.35-26.el7.x86_64 already installed and latest version
Package gd-devel-2.0.35-26.el7.x86_64 already installed and latest version
Package 1:make-3.82-23.el7.x86_64 already installed and latest version
Package 1:net-snmp-5.7.2-28.el7.x86_64 already installed and latest version
Package unzip-6.0-16.el7.x86_64 already installed and latest version
Resolving Dependencies
…
--> Processing Dependency: grub2-common = 1:2.02-0.64.el7.centos for package: 1:grub2-tools-2.02-0.64.el7.centos.x86_64
---> Package grub2-tools-efi.x86_64 1:2.02-0.64.el7.centos will be obsoleting
---> Package grub2-tools-extra.x86_64 1:2.02-0.64.el7.centos will be obsoleting
---> Package grub2-tools-minimal.x86_64 1:2.02-0.64.el7.centos will be obsoleting
---> Package grubby.x86_64 0:8.28-21.el7_3 will be updated
---> Package grubby.x86_64 0:8.28-23.el7 will be an update
---> Package gsettings-desktop-schemas.x86_64 0:3.14.2-1.el7 will be updated
---> Package gsettings-desktop-schemas.x86_64 0:3.22.0-1.el7 will be an update
---> Package gzip.x86_64 0:1.5-8.el7 will be updated
---> Package gzip.x86_64 0:1.5-9.el7 will be an update
---> Package haproxy.x86_64 0:1.5.18-3.el7_3.1 will be updated
Downloading packages:
(1/30): freetype-devel-2.4.11-15.el7.x86_64.rpm                                                                                | 356 kB  00:00:00
(2/30): cpp-4.8.5-16.el7.x86_64.rpm                                                                                            | 5.9 MB  00:00:01
(3/30): gd-2.0.35-26.el7.x86_64.rpm                                                                                            | 146 kB  00:00:00
(4/30): gd-devel-2.0.35-26.el7.x86_64.rpm                                                                                      |  79 kB  00:00:00
(5/30): glibc-devel-2.17-196.el7.x86_64.rpm                                                                                    | 1.1 MB  00:00:00
(6/30): glibc-headers-2.17-196.el7.x86_64.rpm                                                                                  | 675 kB  00:00:00
(7/30): kernel-headers-3.10.0-693.2.2.el7.x86_64.rpm                                                                           | 6.0 MB  00:00:00
(8/30): libX11-devel-1.6.5-1.el7.x86_64.rpm                                                                                    | 980 kB  00:00:00
(9/30): libXau-devel-1.0.8-2.1.el7.x86_64.rpm                                                                                  |  14 kB  00:00:00
(10/30): libXpm-3.5.12-1.el7.x86_64.rpm                                                                                        |  55 kB  00:00:00
(11/30): libXpm-devel-3.5.12-1.el7.x86_64.rpm                                                                                  |  36 kB  00:00:00
(12/30): fontconfig-devel-2.10.95-11.el7.x86_64.rpm                                                                            | 128 kB  00:00:02
(13/30): libXt-1.1.5-3.el7.x86_64.rpm                                                                                          | 173 kB  00:00:00
(14/30): gcc-4.8.5-16.el7.x86_64.rpm                                                                                           |  16 MB  00:00:02
(15/30): libjpeg-turbo-devel-1.2.90-5.el7.x86_64.rpm                                                                           |  98 kB  00:00:00
(16/30): libpng-devel-1.5.13-7.el7_2.x86_64.rpm                                                                                                           | 122 kB  00:00:00
(17/30): libmpc-1.0.1-3.el7.x86_64.rpm                                                                                                                    |  51 kB  00:00:00

(18/30): libxcb-devel-1.12-1.el7.x86_64.rpm                                                                                                               | 1.0 MB  00:00:00

(19/30): libzip-0.10.1-8.el7.x86_64.rpm                                                                                                                   |  48 kB  00:00:00

(20/30): lm_sensors-libs-3.4.0-4.20160601gitf9185e5.el….
….
Installed:
  gcc.x86_64 0:4.8.5-16.el7  gd.x86_64 0:2.0.35-26.el7  gd-devel.x86_64 0:2.0.35-26.el7  net-snmp.x86_64 1:5.7.2-28.el7  php.x86_64 0:5.4.16-42.el7  unzip.x86_64 0:6.0-16.el7
Dependency Installed:
  cpp.x86_64 0:4.8.5-16.el7                            fontconfig-devel.x86_64 0:2.10.95-11.el7                           freetype-devel.x86_64 0:2.4.11-15.el7
  glibc-devel.x86_64 0:2.17-196.el7                    glibc-headers.x86_64 0:2.17-196.el7                                kernel-headers.x86_64 0:3.10.0-693.2.2.el7
  libX11-devel.x86_64 0:1.6.5-1.el7                    libXau-devel.x86_64 0:1.0.8-2.1.el7                                libXpm.x86_64 0:3.5.12-1.el7
  libXpm-devel.x86_64 0:3.5.12-1.el7                   libXt.x86_64 0:1.1.5-3.el7                                         libjpeg-turbo-devel.x86_64 0:1.2.90-5.el7
  libmpc.x86_64 0:1.0.1-3.el7                          libpng-devel.x86_64 2:1.5.13-7.el7_2                               libxcb-devel.x86_64 0:1.12-1.el7
  libzip.x86_64 0:0.10.1-8.el7                         lm_sensors-libs.x86_64 0:3.4.0-4.20160601gitf9185e5.el7            mpfr.x86_64 0:3.1.1-4.el7
  net-snmp-agent-libs.x86_64 1:5.7.2-28.el7            net-snmp-libs.x86_64 1:5.7.2-28.el7                                perl-Data-Dumper.x86_64 0:2.145-3.el7
  php-cli.x86_64 0:5.4.16-42.el7                       php-common.x86_64 0:5.4.16-42.el7                                  xorg-x11-proto-devel.noarch 0:7.7-20.el7
Complete!

Downloading the Nagios Core 4.3.2 Packages.

Once the dependencies are installed we will download the Nagios Core 4.3.3 and Nagios plugins 2.2.1 from the Nagios office repository.

Nagios Core 4.3.3
[root@localhost ~]#  wget https://sourceforge.net/projects/nagios/files/nagios-4.x/nagios-4.3.4/nagios-4.3.4.tar.gz
--2017-10-13 07:09:11--  https://sourceforge.net/projects/nagios/files/nagios-4.x/nagios-4.3.4/nagios-4.3.4.tar.gz
Resolving sourceforge.net (sourceforge.net)... 216.34.181.60
Connecting to sourceforge.net (sourceforge.net)|216.34.181.60|:443... connected.
HTTP request sent, awaiting response... 302 Found
Location: https://sourceforge.net/projects/nagios/files/nagios-4.x/nagios-4.3.4/nagios-4.3.4.tar.gz/download [following]
--2017-10-13 07:09:12--  https://sourceforge.net/projects/nagios/files/nagios-4.x/nagios-4.3.4/nagios-4.3.4.tar.gz/download
Connecting to sourceforge.net (sourceforge.net)|216.34.181.60|:443... connected.
HTTP request sent, awaiting response... 302 Found
Location: https://downloads.sourceforge.net/project/nagios/nagios-4.x/nagios-4.3.4/nagios-4.3.4.tar.gz?r=&ts=1507892953&use_mirror=excellmedia [following]
--2017-10-13 07:09:13--  https://downloads.sourceforge.net/project/nagios/nagios-4.x/nagios-4.3.4/nagios-4.3.4.tar.gz?r=&ts=1507892953&use_mirror=excellmedia
Resolving downloads.sourceforge.net (downloads.sourceforge.net)... 216.34.181.59
Connecting to downloads.sourceforge.net (downloads.sourceforge.net)|216.34.181.59|:443... connected.
HTTP request sent, awaiting response... 302 Found
Location: https://excellmedia.dl.sourceforge.net/project/nagios/nagios-4.x/nagios-4.3.4/nagios-4.3.4.tar.gz [following]
--2017-10-13 07:09:14--  https://excellmedia.dl.sourceforge.net/project/nagios/nagios-4.x/nagios-4.3.4/nagios-4.3.4.tar.gz
Resolving excellmedia.dl.sourceforge.net (excellmedia.dl.sourceforge.net)... 202.153.32.19
Connecting to excellmedia.dl.sourceforge.net (excellmedia.dl.sourceforge.net)|202.153.32.19|:443... connected.
HTTP request sent, awaiting response... 200 OK
Length: 11096863 (11M) [application/x-gzip]
Saving to: ‘nagios-4.3.4.tar.gz’
100%[=======================================================================================================================================>] 11,096,863   319KB/s   in 37s
2017-10-13 07:09:53 (295 KB/s) - ‘nagios-4.3.4.tar.gz’ saved [11096863/11096863]
Nagios Plugins 2.2.1
# wget https://nagios-plugins.org/download/nagios-plugins-2.2.1.tar.gz
--2017-10-13 07:10:38--  https://nagios-plugins.org/download/nagios-plugins-2.2.1.tar.gz
Resolving nagios-plugins.org (nagios-plugins.org)... 72.14.186.43
Connecting to nagios-plugins.org (nagios-plugins.org)|72.14.186.43|:443... connected.
HTTP request sent, awaiting response... 200 OK
Length: 2728818 (2.6M) [application/x-gzip]
Saving to: ‘nagios-plugins-2.2.1.tar.gz’
100%[=======================================================================================================================================>] 2,728,818   1.44MB/s   in 1.8s
2017-10-13 07:10:41 (1.44 MB/s) - ‘nagios-plugins-2.2.1.tar.gz’ saved [2728818/2728818]

Once the files are downloaded we will extract the files using the below command.

[root@localhost ~]# tar -zxpvf nagios-plugins-2.2.1.tar.gz
[root@localhost ~]# tar -zxvf nagios-4.3.4.tar.gz

Creating Nagios User and Group.

As we needed to create a user Nagios and a group called nagcmd for running the Nagios and give user permissions on the group and apache.

[root@localhost ~]# groupadd nagcmd
[root@localhost ~]# useradd nagios
[root@localhost ~]# passwd nagios
Changing password for user nagios.
New password:
Retype new password:
passwd: all authentication tokens updated successfully.
[root@localhost ~]# usermod -G nagcmd nagios
[root@localhost ~]# usermod -G nagcmd apache

Installing Nagios Core 4.3.3

Now we will install the Nagios Core 4.3.3 by changing the director to Nagios core install directory and running the below command.

[root@localhost ~]# cd nagios-4.3.4
[root@localhost nagios-4.3.4]# ./configure --with-command-group=nagcmd
./configure --with-command-group=nagcmd
checking for a BSD-compatible install... /usr/bin/install -c
checking build system type... x86_64-pc-linux-gnu
checking host system type... x86_64-pc-linux-gnu
checking for gcc... gcc
checking whether the C compiler works... yes
checking for C compiler default output file name... a.out
checking for suffix of executables...
checking whether we are cross compiling... no
checking for suffix of object files... o
checking whether we are using the GNU C compiler... yes
checking whether gcc accepts -g... yes
checking for gcc option to accept ISO C89... none needed
checking whether make sets $(MAKE)... yes
checking whether ln -s works... yes
checking for strip... /usr/bin/strip
checking how to run the C preprocessor... gcc -E
checking for grep that handles long lines and -e... /usr/bin/grep
…
…
*** Configuration summary for nagios 4.3.2 2017-05-09 ***:
 General Options:
-------------------------
        Nagios executable:  nagios
        Nagios user/group:  nagios,nagios
       Command user/group:  nagios,nagcmd
             Event Broker:  yes
        Install ${prefix}:  /usr/local/nagios
    Install ${includedir}:  /usr/local/nagios/include/nagios
                Lock file:  ${prefix}/var/nagios.lock
   Check result directory:  ${prefix}/var/spool/checkresults
           Init directory:  /etc/rc.d/init.d
  Apache conf.d directory:  /etc/httpd/conf.d
             Mail program:  /bin/mail
                  Host OS:  linux-gnu
          IOBroker Method:  epoll
 Web Interface Options:
 ------------------------
                 HTML URL:  http://localhost/nagios/
                  CGI URL:  http://localhost/nagios/cgi-bin/
 Traceroute (used by WAP):
Review the options above for accuracy.  If they look okay,
type 'make all' to compile the main program and CGIs.
Now we will compile the main programs using the below commands


[root@localhost nagios-4.3.4]# make all
cd ./base && make
make[1]: Entering directory `/root/nagios-4.3.4/base'
gcc -Wall -I.. -g -O2 -DHAVE_CONFIG_H -DNSCORE -c -o nagios.o nagios.c
gcc -Wall -I.. -g -O2 -DHAVE_CONFIG_H -DNSCORE   -c -o broker.o broker.c
gcc -Wall -I.. -g -O2 -DHAVE_CONFIG_H -DNSCORE   -c -o nebmods.o nebmods.c
gcc -Wall -I.. -g -O2 -DHAVE_CONFIG_H -DNSCORE -c -o ../common/shared.o ../common/shared.c
gcc -Wall -I.. -g -O2 -DHAVE_CONFIG_H -DNSCORE   -c -o nerd.o nerd.c
gcc -Wall -I.. -g -O2 -DHAVE_CONFIG_H -DNSCORE   -c -o query-handler.o query-handler.c
gcc -Wall -I.. -g -O2 -DHAVE_CONFIG_H -DNSCORE -c -o workers.o workers.c
gcc -Wall -I.. -g -O2 -DHAVE_CONFIG_H -DNSCORE   -c -o checks.o checks.c
..
..
make[1]: Leaving directory `/root/nagios-4.3.4/worker'
*** Compile finished ***
If the main program and CGIs compiled without any errors, you
can continue with installing Nagios as follows (type 'make'
without any arguments for a list of all possible options):
  make install
     - This installs the main program, CGIs, and HTML files
  make install-init
     - This installs the init script in /etc/rc.d/init.d
  make install-commandmode
     - This installs and configures permissions on the
       directory for holding the external command file
  make install-config
     - This installs *SAMPLE* config files in /usr/local/nagios/etc
       You'll have to modify these sample files before you can
       use Nagios.  Read the HTML documentation for more info
       on doing this.  Pay particular attention to the docs on
       object configuration files, as they determine what/how
       things get monitored!
  make install-webconf
     - This installs the Apache config file for the Nagios
       web interface
  make install-exfoliation
     - This installs the Exfoliation theme for the Nagios web interface
  make install-classicui
     - This installs the classic theme for the Nagios web interface
*** Support Notes *******************************************
If you have questions about configuring or running Nagios,
please make sure that you:
..
..


Once the Nagios files compete we needed to init scripts, make Nagios work from CLI, and also install some sample config files, a config web interface to run the Nagios from web browsers.

[root@localhost nagios-4.3.4]# make install-init
/usr/bin/install -c -m 755 -d -o root -g root /etc/rc.d/init.d
/usr/bin/install -c -m 755 -o root -g root daemon-init /etc/rc.d/init.d/nagios
*** Init script installed ***
[root@localhost nagios-4.3.4]# make install-commandmode
/usr/bin/install -c -m 775 -o nagios -g nagcmd -d /usr/local/nagios/var/rw
chmod g+s /usr/local/nagios/var/rw
*** External command directory configured ***
[root@localhost nagios-4.3.4]# make install-config
/usr/bin/install -c -m 775 -o nagios -g nagios -d /usr/local/nagios/etc
/usr/bin/install -c -m 775 -o nagios -g nagios -d /usr/local/nagios/etc/objects
/usr/bin/install -c -b -m 664 -o nagios -g nagios sample-config/nagios.cfg /usr/local/nagios/etc/nagios.cfg
/usr/bin/install -c -b -m 664 -o nagios -g nagios sample-config/cgi.cfg /usr/local/nagios/etc/cgi.cfg
/usr/bin/install -c -b -m 660 -o nagios -g nagios sample-config/resource.cfg /usr/local/nagios/etc/resource.cfg
/usr/bin/install -c -b -m 664 -o nagios -g nagios sample-config/template-object/templates.cfg /usr/local/nagios/etc/objects/templates.cfg
/usr/bin/install -c -b -m 664 -o nagios -g nagios sample-config/template-object/commands.cfg /usr/local/nagios/etc/objects/commands.cfg
/usr/bin/install -c -b -m 664 -o nagios -g nagios sample-config/template-object/contacts.cfg /usr/local/nagios/etc/objects/contacts.cfg
/usr/bin/install -c -b -m 664 -o nagios -g nagios sample-config/template-object/timeperiods.cfg /usr/local/nagios/etc/objects/timeperiods.cfg
/usr/bin/install -c -b -m 664 -o nagios -g nagios sample-config/template-object/localhost.cfg /usr/local/nagios/etc/objects/localhost.cfg
/usr/bin/install -c -b -m 664 -o nagios -g nagios sample-config/template-object/windows.cfg /usr/local/nagios/etc/objects/windows.cfg
/usr/bin/install -c -b -m 664 -o nagios -g nagios sample-config/template-object/printer.cfg /usr/local/nagios/etc/objects/printer.cfg
/usr/bin/install -c -b -m 664 -o nagios -g nagios sample-config/template-object/switch.cfg /usr/local/nagios/etc/objects/switch.cfg
*** Config files installed ***
Remember, these are *SAMPLE* config files.  You'll need to read
the documentation for more information on how to actually define
services, hosts, etc. to fit your particular needs.


[root@localhost nagios-4.3.4]# make install-webconf
/usr/bin/install -c -m 644 sample-config/httpd.conf /etc/httpd/conf.d/nagios.conf
if [ 0 -eq 1 ]; then \
        ln -s /etc/httpd/conf.d/nagios.conf /etc/apache2/sites-enabled/nagios.conf; \
fi
*** Nagios/Apache conf file installed ***

Once the web interface is installed and configured on the Apache we needed to create a default username we called it ‘nagiosadmin’ and create a password for the user herein demo purposes we will create the same as the username, below is the command to create the use and password for the user

[root@localhost nagios-4.3.4]# htpasswd -s -c /usr/local/nagios/etc/htpasswd.users nagiosadmin
New password:
Re-type new password:
Adding password for user nagiosadmin

Configure the email alerts for sending Notifications from Nagios.

This is an optional step but if we can do it this will help us to get the notifications and email alerts if something goes wrong with the servers and machines we monitor. We needed to update the email id in the area where it is highlighted with red.

[root@localhost nagios-4.3.4]# vi /usr/local/nagios/etc/objects/contacts.cfg
###############################################################################
# CONTACTS.CFG - SAMPLE CONTACT/CONTACTGROUP DEFINITIONS
#
#
# NOTES: This config file provides you with some example contact and contact
#        group definitions that you can reference in host and service
#        definitions.
#
#        You don't need to keep these definitions in a separate file from your
#        other object definitions.  This has been done just to make things
#        easier to understand.
#
###############################################################################
###############################################################################
###############################################################################
#
# CONTACTS
#
###############################################################################
###############################################################################
# Just one contact defined by default - the Nagios admin (that's you)
# This contact definition inherits a lot of default values from the 'generic-contact'
# template which is defined elsewhere.

define contact{
        contact_name                    nagiosadmin             ; Short name of user
        use                             generic-contact         ; Inherit default values from generic-contact template (defined above)
        alias                           Nagios Admin            ; Full name of user
        email                           nagios@localhost        ; <<***** CHANGE THIS TO YOUR EMAIL ADDRESS ******
        }
###############################################################################

###############################################################################
#
# CONTACT GROUPS
#
"/usr/local/nagios/etc/objects/contacts.cfg" 54L, 2138C
...
...

Nagios Plugins Installation.

Once the core is ready and configured we will now install the Nagios plugins

[root@localhost nagios-plugins-2.2.1]# ./configure --with-nagios-user=nagios --with-nagios-group=Nagios
checking for a BSD-compatible install... /usr/bin/install -c
checking whether build environment is sane... yes
checking for a thread-safe mkdir -p... /usr/bin/mkdir -p
checking for gawk... gawk
checking whether make sets $(MAKE)... yes
checking whether to disable maintainer-specific portions of Makefiles... yes
checking build system type... x86_64-unknown-linux-gnu
checking host system type... x86_64-unknown-linux-gnu
checking for gcc... gcc
checking for C compiler default output file name... a.out
checking whether the C compiler works... yes
checking whether we are cross compiling... no
checking for suffix of executables...
checking for suffix of object files... o
checking whether we are using the GNU C compiler... yes
checking whether gcc accepts -g... yes
checking for gcc option to accept ISO C89... none needed
checking for style of include used by make... GNU
checking dependency style of gcc... gcc3
..
..
configure: creating ./config.status
config.status: creating gl/Makefile
config.status: creating nagios-plugins.spec
config.status: creating tools/build_perl_modules
config.status: creating Makefile
config.status: creating tap/Makefile
config.status: creating lib/Makefile
config.status: creating plugins/Makefile
config.status: creating lib/tests/Makefile
config.status: creating plugins-root/Makefile
config.status: creating plugins-scripts/Makefile
config.status: creating plugins-scripts/utils.pm
config.status: creating plugins-scripts/utils.sh
config.status: creating perlmods/Makefile
config.status: creating test.pl
config.status: creating pkg/solaris/pkginfo
config.status: creating po/Makefile.in
config.status: creating config.h
config.status: config.h is unchanged
config.status: executing depfiles commands
config.status: executing libtool commands
config.status: executing po-directories commands
config.status: creating po/POTFILES
config.status: creating po/Makefile
[root@localhost nagios-plugins-2.2.1]# make
[root@localhost nagios-plugins-2.2.1]# make install

Verifying the Nagios Configuration files

Once the plugins are installed we will verify the Nagios configuration to make sure that everything is working fine needed to restart the Nagios daemon.

[root@localhost nagios-plugins-2.2.1]# /usr/local/nagios/bin/nagios -v /usr/local/nagios/etc/nagios.cfg
Nagios Core 4.3.3
Copyright (c) 2009-present Nagios Core Development Team and Community Contributors
Copyright (c) 1999-2009 Ethan Galstad
Last Modified: 2017-05-09
License: GPL
Website: https://www.nagios.org
Reading configuration data...
   Read main config file okay...
   Read object config files okay...
Running pre-flight check on configuration data...
Checking objects...
        Checked 8 services.
        Checked 1 hosts.
        Checked 1 host groups.
        Checked 0 service groups.
        Checked 1 contacts.
        Checked 1 contact groups.
        Checked 24 commands.
        Checked 5 time periods.
        Checked 0 host escalations.
        Checked 0 service escalations.
Checking for circular paths...
        Checked 1 hosts
        Checked 0 service dependencies
        Checked 0 host dependencies
        Checked 5 timeperiods
Checking global event handlers...
Checking obsessive compulsive processor commands...
Checking misc settings...
Total Warnings: 0
Total Errors:   0
Things look okay - No serious problems were detected during the pre-flight check


If we have not found any errors or warnings we will restart the Nagios & httpd and enable them to start at the server startup.

[root@localhost nagios-plugins-2.2.1]# systemctl restart nagios

[root@localhost nagios-plugins-2.2.1]# systemctl restart httpd

[root@localhost nagios-plugins-2.2.1]# systemctl enable nagios

nagios.service is not a native service, redirecting to /sbin/chkconfig.

Executing /sbin/chkconfig nagios on

[root@localhost nagios-plugins-2.2.1]# systemctl enable httpd

Created symlink from /etc/systemd/system/multi-user.target.wants/httpd.service to /usr/lib/systemd/system/httpd.service.

Nagios Web-interface.

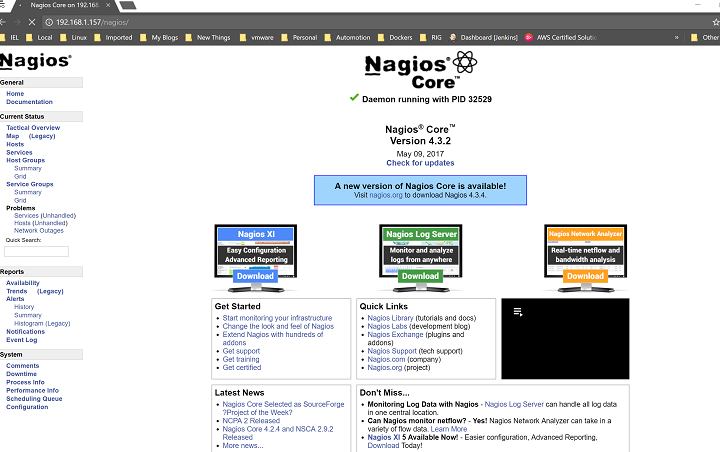
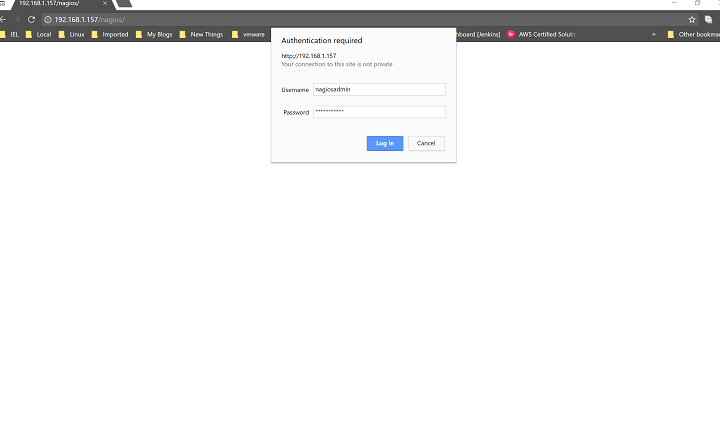
As everything is configured we will now check the web interface of Nagios using the user ‘nagiosadmin’.

Access the web browser using the URL http://IP-Address/nagios

Login Page.
nagios core 4.3.2-1

Home Page for Nagios Core 4.3.4

nagios core 4.3.2-2.png

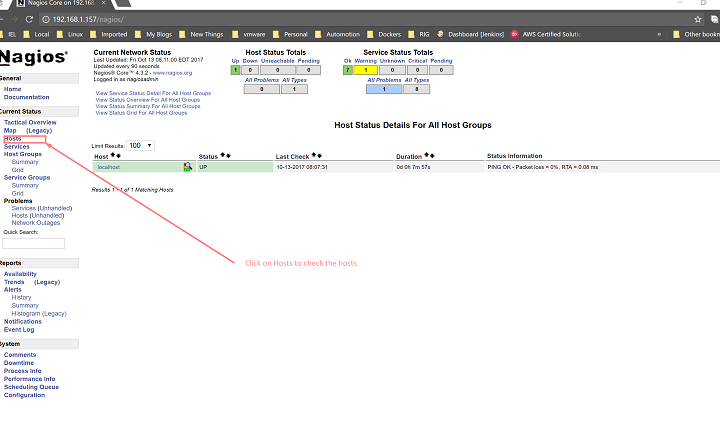
Nagios HOSTS page

nagios core 4.3.2-3.png

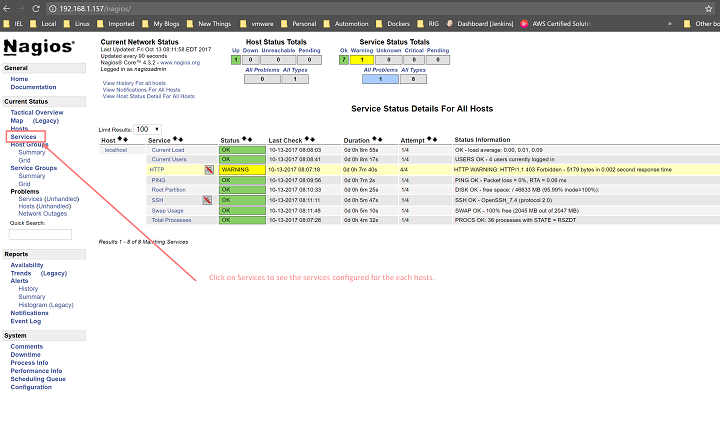
Nagios Services Page

nagios core 4.3.2-4

In the above article we have learned about how to install the Nagios Core 4.3.4, Nagios Plugins 2.2.1,  created Nagios admin user, init, web-interface, etc.


How to Configure and Install Ansible on CentOS 7.x

This article is written to understand Ansible and install.  Ansible is an open source automation software for configuring, managing and deploying software applications on the nodes without any downtime without any client agent install just by using SSH. Now a day’s most of the IT Automation tools runs as an agent on the remote host, but Ansible needs an SSH connection and Python (2.4 or later) to be installed on the remote nodes to perform the actions.

Environment Setup Details

Ansible Server:
Operating System:    Centos 6.7
IP Address:    192.168.87.140
Host-name:    ansible.hanuman.com
User:    ansibileadmin
Remote Nodes: 
Node 1: 192.168.87.156
Node 2: 192.168.87.157

Installing Controlling Machine – Ansible

There is no official Ansible repository for RPB based clones, but we can install Ansible by enabling EPEL repository using RHEL/CentOS 6.x, 7.x using the currently supported fedora distributions.

# rpm -Uvh http://download.fedoraproject.org/pub/epel/6/i386/epel-release-6-8.noarch.rpmRetrieving http://download.fedoraproject.org/pub/epel/6/i386/epel-release-6-8.no             arch.rpm
warning: /var/tmp/rpm-tmp.nHoRHj: Header V3 RSA/SHA256 Signature, key ID 0608b89             5: NOKEY
Preparing...                ########################################### [100%]
package epel-release-6-8.noarch is installed

After configuring EPEL repository, you can now install Ansible using yum with the below command.

# sudo yum install ansible -y
Loaded plugins: fastestmirror, security
Setting up Install Process
Determining fastest mirrors
epel/metalink                                            | 4.3 kB     00:00
 * base: centosmirror.go4hosting.in
 * epel: epel.mirror.net.in
 * extras: centosmirror.go4hosting.in
 * updates: centosmirror.go4hosting.in
base                                                     | 3.7 kB     00:00
epel                                                     | 4.3 kB     00:00
epel/primary_db                                          | 5.8 MB     00:00
extras                                                   | 3.4 kB     00:00
updates                                                  | 3.4 kB     00:00
updates/primary_db                                       | 4.0 MB     00:00
Resolving Dependencies
.
.
.
.
Running Transaction
  Installing : sshpass-1.05-1.el6.x86_64                                                1/11
  Installing : python-crypto2.6-2.6.1-2.el6.x86_64                                      2/11
  Installing : python-pyasn1-0.0.12a-1.el6.noarch                                       3/11
  Installing : python-keyczar-0.71c-1.el6.noarch                                        4/11
  Installing : python-simplejson-2.0.9-3.1.el6.x86_64                                   5/11
  Installing : python-httplib2-0.7.7-1.el6.noarch                                       6/11
  Installing : libyaml-0.1.3-4.el6_6.x86_64                                             7/11
  Installing : PyYAML-3.10-3.1.el6.x86_64                                               8/11
  Installing : python-babel-0.9.4-5.1.el6.noarch                                        9/11
  Installing : python-jinja2-2.2.1-2.el6_5.x86_64                                      10/11
  Installing : ansible-1.9.4-1.el6.noarch                                          11/11
  Installed:
  ansible.noarch 0:1.9.4-1.el6
Dependency Installed:
  PyYAML.x86_64 0:3.10-3.1.el6                   libyaml.x86_64 0:0.1.3-4.el6_6
  python-babel.noarch 0:0.9.4-5.1.el6            python-crypto2.6.x86_64 0:2.6.1-2.el6
  python-httplib2.noarch 0:0.7.7-1.el6           python-jinja2.x86_64 0:2.2.1-2.el6_5
  python-keyczar.noarch 0:0.71c-1.el6            python-pyasn1.noarch 0:0.0.12a-1.el6
  python-simplejson.x86_64 0:2.0.9-3.1.el6       sshpass.x86_64 0:1.05-1.el6
Complete!

After installation completed, we can verify the version of Ansible by running this below command.

# ansible --version
ansible 1.9.4
  configured module search path = None

Preparing SSH Keys to Remote Hosts

To perform any deployment or management from the local host to remote host first we need to create and copy the ssh keys to the remote host. In every remote host, there will be a user account ansible (in your case may be the different user).

First, let me create an SSH key using the below command and copy the key to remote hosts.

# ssh-keygen -t rsa -b 4096 -C "ansible.hanuman.com"
Generating public/private rsa key pair.
Enter file in which to save the key (/root/.ssh/id_rsa):
Enter passphrase (empty for no passphrase):
Enter same passphrase again:
Your identification has been saved in ansible_key.
Your public key has been saved in ansible_key.pub.
The key fingerprint is:
28:ae:0c:8d:91:0a:fa:ac:2f:e2:8c:e5:fd:28:4b:c6 ansible.hanuman.com
The key's randomart image is:
+--[ RSA 4096]----+
|                 |
|                 |
|                 |
| .     .         |
|+   . . S        |
|+= . .           |
|= E .            |
|=X.o .           |
|=*Ooo..          |
+-----------------+

After creating SSH Key successfully, now copy the created key to all two remote servers, We need a user to do ansible here for a demo I am using root user from where we can perform the ansible tasks

# ssh-copy-id root@192.168.87.156
root@192.168.87.156's password:
Now try logging into the machine, with "ssh 'root@192.168.87.156'", and check in:
  .ssh/authorized_keys
to make sure we haven't added extra keys that you weren't expecting.
# ssh-copy-id root@192.168.87.157
root@192.168.87.157's password:
Now try logging into the machine, with "ssh 'root@192.168.87.157'", and check in:
.ssh/authorized_keys
To make sure we haven't added extra keys that you weren't expecting.

Copy SSH Key Second Remote Host

After copying all SSH Keys to the remote host, now perform an ssh key authentication on all remote hosts to check whether authentication working or not.

# ssh root@192.168.87.156
[ansible@localhost ~]# logout
Connection to 192.168.87.156 closed.
# ssh root@192.168.87.157
[ansible@localhost ~]#

Creating Inventory File for Remote Hosts

Inventory file, This file has information of the hosts for which host we need to get connected from local to remote. The Default configuration file will be under /etc/ansible/hosts.

Now we will add the two nodes to the configuration file. Open and edit the file using your favorite editor, Here I use vim.

# sudo vim /etc/ansible/hosts

Add the following two hosts IP address.

.
.
.
.
[webservers]
192.168.87.156
192.168.87.157

Note:  [webservers] in the brackets indicates as group names, it is used to classify the nodes and group them and to control at what times and for what reason.

To Test weather, the Ansible configured correctly or not.

Now time to check our all 3 servers by just doing a ping from my localhost. To perform the action we need to use the command ‘ansible‘ with options ‘-m‘ (module) and ‘-all‘ (group of servers).

# ansible -m ping webservers
[root@localhost ~]# ansible -m ping webservers
192.168.87.157 | success >> {
    "changed": false,
    "ping": "pong"
}

192.168.87.156 | success >> {
    "changed": false,
    "ping": "pong"
}

OR

# ansible -m ping -all
[root@localhost ~]# ansible -m ping webservers
192.168.87.157 | success >> {
    "changed": false,
    "ping": "pong"
}
192.168.87.156 | success >> {
    "changed": false,
    "ping": "pong"
}

In the above example, we’ve used ping module with Ansible command to ping all remote hosts at ones, the same way there are various modules can be used with Ansible, you can find available modules from the ansible Official site here.

Now, here we are using another module called ‘command‘, which is used to execute a list of shell commands (like, df, free, uptime, etc.) on all selected remote hosts at one go. For demo, you can execute the below commands.

Check the partitions on all web servers.

# ansible -m command -a "df -h" webservers

192.168.87.156 | success | rc=0 >>
 Filesystem            Size  Used Avail Use% Mounted on
 /dev/mapper/VolGroup-lv_root
 18G  2.0G   15G  12% /
 tmpfs                 491M     0  491M   0% /dev/shm
 /dev/sda1             477M   42M  411M  10% /boot


192.168.87.157 | success | rc=0 >>
 Filesystem            Size  Used Avail Use% Mounted on
 /dev/mapper/VolGroup-lv_root
 18G  2.0G   15G  12% /
 tmpfs                 491M     0  491M   0% /dev/shm
 /dev/sda1             477M   42M  411M  10% /boot

Check memory usage on all web servers.

# ansible -m command -a "free -mt" webservers

192.168.87.156 | success | rc=0 >>  
Total       used       free     shared    buffers     cached  Mem:           
981        528        453          0         39        322  -/+ buffers/cache:        166        815  Swap:         2047          0       2047  Total:        3029        528       2501

192.168.87.157 | success | rc=0 >> 
Total       used       free     shared    buffers     cached  Mem:           
981        526        455          0         39        322  -/+ buffers/cache:        164        817  Swap:         2047          0       2047  Total:        3029        526       2503

Checking Uptime for all web servers.

# ansible -m command -a "uptime" webservers
192.168.87.157 | success | rc=0 >>
 21:32:47 up 38 min,  3 users,  load average: 0.03, 0.01, 0.00
192.168.87.156 | success | rc=0 >>
 21:32:47 up 38 min,  3 users,  load average: 0.00, 0.01, 0.03

Check for hostname and Architecture.

# ansible -m command -a "arch" webservers
 192.168.87.156 | success | rc=0 >>
 x86_64
192.168.87.157 | success | rc=0 >>
 x86_64
# ansible -m shell -a "hostname" webservers
192.168.87.157 | success | rc=0 >>
 localhost.localdomain
192.168.87.156 | success | rc=0 >>
 localhost.localdomain

Checking the service status of all web servers

# ansible -m shell -a "service httpd status" webservers
 192.168.87.157 | FAILED | rc=3 >>
 httpd is stopped
192.168.87.156 | FAILED | rc=3 >>
 httpd is stopped

Redirecting the output to a file.

# ansible -m shell -a "service httpd status" webservers > service_status.txt
# cat service_status.txt
 192.168.87.156 | FAILED | rc=3 >>
 httpd is stopped
192.168.87.157 | FAILED | rc=3 >>
 httpd is stopped

To shut down all the web servers.

#ansible -m shell -a "init 0" webservers
 192.168.87.157 | success | rc=0 >>
192.168.87.156 | success | rc=0 >>

Like this way, we can run many shell commands using ansible as what we have run the above steps.

Ansible is a Powerful IT automation tool which is must be used by every Linux Admins for deploying applications and managing servers at one go. Among many other automation tools such as Puppet, Chef, etc., Ansible is quite very interesting and very easy to set up for a good production environment.

AWS: Expanding the Linux root Volume without stopping/shutdown (online).

In this tutorial, we will learn how to expand or increase the Linux root volume without stopping/shutdown the instance or stopping any services on the instance without restart.

In this, we have 2 steps to be followed.

  1. We have to change the volume size on the AWS console.
  2. We have to increase the partition size on the Linux Instance.

AWS Console Changes

  • Log in to the AWS Console.
  • Click on EC2
  • Find the Instance on which we want to increase the volume.
  • Find the Root partition of the Instance in the description panel.

linux1

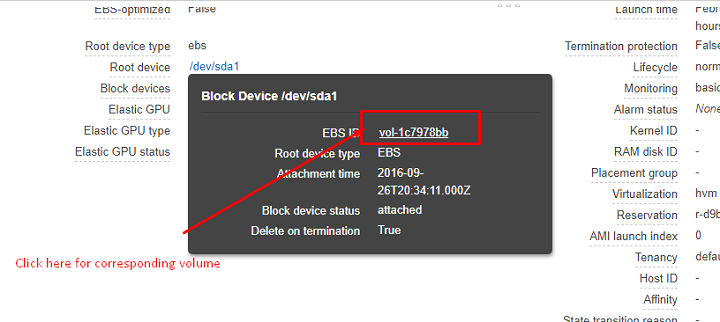
  • Click on the Root Device, which will show all the device information on the popup.

linux2

  • Click on EBI ID. This will take you to respective volume on EBS Volumes
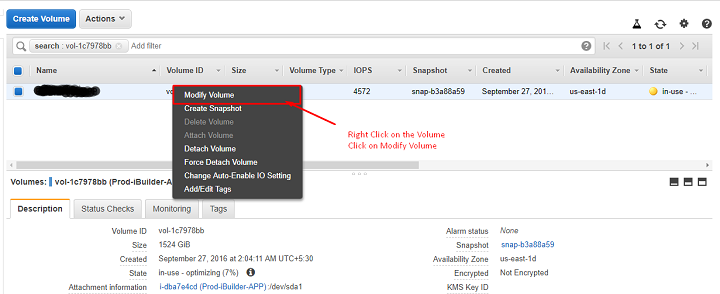
  • Right-Click on the respective volume where we want to increase the disk space.
  • Click on Modify Volume.linux3
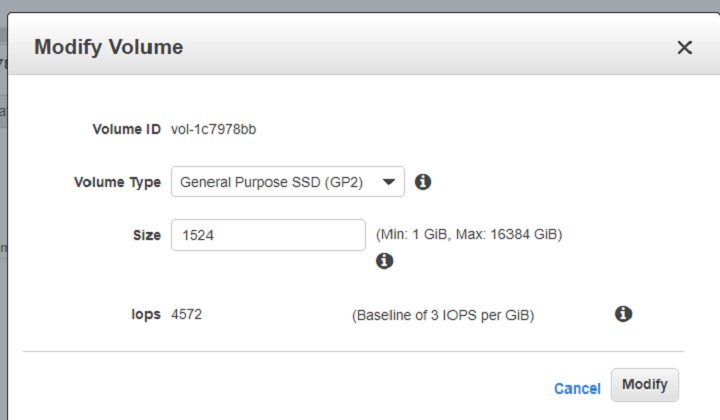
  • Once the Modify Volume pop-up, increase the size of the Volume to our need and Click on Modify.

linux4

  • It will take around 5 – 8 min to increase the volume size on the AWS console after some time we can see the increased size on the AWS console.

Linux Instance Side.

  • Log in to the Instance using the Credentials and corresponding key pair.
  • Check the Existing disk space using the command df –h
$ df -h
Filesystem            Size  Used Avail Use% Mounted on
/dev/xvda1            7.9G  7.1M  0.8G  90% /
tmpfs                 1.9G     0  1.9G   0% /dev/shm
  • Change the login to root user by using sudo –i.
  • Run lsbk to show the block devices attached to the instance.
# lsbk
NAME    MAJ:MIN RM   SIZE RO TYPE MOUNTPOINT
xvda    202:0    0   10 G  0 disk
└─xvda1 202:1    0   7.9G  0 part /

Here if we see that the block device xvda has 10 GB attached and having 1 partition with 7.9 GB for the root

  • Run the growpart command to increase the root partition (/)
# growpart /dev/xvda 1

The filesystem on /dev/xvda1 is now 18350080 blocks long.

  • Finally, increase the root partition with resize command
# resize2fs /dev/xvda1
resize2fs 1.42.3
   Filesystem at /dev/xvda1 is mounted on /; on-line resizing required
    old_desc_blocks = 1, new_desc_blocks = 5
    Performing an on-line resize of /dev/xvda1 to 18350080 (4k) blocks.
    The filesystem on /dev/xvda1 is now 18350080 blocks long.
  • Now if we check the disk space using df, we can observe the disk space has been increased to a size we have extended on the AWS.
# df -h
Filesystem            Size  Used Avail Use% Mounted on
/dev/xvda1            10G  7.1M  2.9G  69% /
tmpfs                 1.9G     0  1.9G   0% /dev/shm
How to add a New Disk Drive to a Linux System
Introduction

This article helps us to configure and add a new disk to the Linux box which is of the common problems encountered by system administrators these days is that servers tend to run out of disk space to store data. Fortunately, disk space is now one of the cheapest, we will look at the steps necessary to configure on Red Hat Enterprise Linux 6. X to add the space by installing the disk.

Contents

• Mounted Filesystems or Logical Volumes
• Getting Started
• Finding the New Hard Drive in RHEL 6
• Creating Linux Partitions
• Creating a Filesystem on an RHEL 6 Disk Partition
• Mounting a Filesystem
• Configuring RHEL 6 to Automatically Mount a Filesystem


Mounted Filesystems or Logical Volumes

One very simplest method is to create one Linux partitions on the new disk, create Linux file systems on those partitions and then mount the disk at a specific mount point so that they can be accessed. This approach will be covered in this chapter.


Getting Started

This tutorial assumes that the new physical hard drive has been installed on the system and is visible to the operating system.

Finding the New Hard Drive in RHEL 6

Assuming the drive is visible to the BIOS it should automatically be detected by the operating system. Typically, the disk drives in a system are assigned device names beginning hd or sd followed by a letter to indicate the device number. For example, the first device might be /dev/sda, the second /dev/sdb and so on.

The following is the output from a system with only one physical disk drive:

# ls /dev/sd*
/dev/sda /dev/sda1 /dev/sda2

This shows that the disk drive represented by /dev/sda is itself divided into 2 partitions, represented by /dev/sda1 and /dev/sda2.

The following output is from the same system after a second hard disk drive has been installed:

# ls /dev/sd*
/dev/sda /dev/sda1 /dev/sda2 /dev/sdb

As shown above, the new hard drive has been assigned to the device file /dev/sdb. Currently the drive has no partitions shown (because we have yet to create any).

At this point we have a choice of creating partitions and file systems on the new drive and mounting them for access or adding the disk as a physical volume as part of a volume group. To perform the former continue with this chapter, otherwise read Adding a New Disk to an RHEL 6 Volume Group and Logical Volume for details on configuring Logical Volumes.

Creating Linux Partitions

The next step is to create one or more Linux partitions on the new disk drive. This is achieved using the fdisk utility which takes as a command-line argument the device to be partitioned:

# fdisk /dev/sdb
Device contains neither a valid DOS partition table, nor Sun, SGI or OSF disklabel
Building a new DOS disklabel with disk identifier 0xd1082b01.
Changes will remain in memory only, until you decide to write them.
After that, of course, the previous content won't be recoverable.
Warning: invalid flag 0x0000 of partition table 4 will be corrected by w(rite)

WARNING: DOS-compatible mode is deprecated. It's strongly recommended to
switch off the mode (command 'c') and change display units to
sectors (command 'u').

Command (m for help):
As instructed, switch off DOS compatible mode and change the units to sectors by entering the c and u commands:

Command (m for help): c
DOS Compatibility flag is not set
Command (m for help): u
Changing display/entry units to sectors
In order to view the current partitions on the disk enter the p command:

Command (m for help): p

Disk /dev/sdb: 34.4 GB, 34359738368 bytes
255 heads, 63 sectors/track, 4177 cylinders
Units = cylinders of 16065 * 512 = 8225280 bytes
Sector size (logical/physical): 512 bytes / 512 bytes
I/O size (minimum/optimal): 512 bytes / 512 bytes
Disk identifier: 0xd1082b01

Device Boot Start End Blocks Id System

As we can see from the above fdisk output the disk currently has no partitions because it is a previously unused disk. The next step is to create a new partition on the disk, a task which is performed by entering n (for new partition) and p (for primary partition)
Command (m for help): n
Command action
e extended
p primary partition (1-4)
p
Partition number (1-4):

In this example we only plan to create one partition which will be partition 1. Next we need to specify where the partition will begin and end. Since this is the first partition we need it to start at the first available sector and since we want to use the entire disk we specify the last sector as the end. Note that if you wish to create multiple partitions you can specify the size of each partition by sectors, bytes, kilobytes or megabytes.

Partition number (1-4): 1
First sector (2048-67108863, default 2048):
Using default value 2048
Last sector, +sectors or +size{K,M,G} (2048-67108863, default 67108863):
Using default value 67108863
Now that we have specified the partition we need to write it to the disk using the w command:

Command (m for help): w
The partition table has been altered!

Calling ioctl() to re-read partition table.
Syncing disks.

If we now look at the devices again we will see that the new partition is visible as /dev/sdb1:

# ls /dev/sd*
/dev/sda /dev/sda1 /dev/sda2 /dev/sdb /dev/sdb1


The next step is to create a filesystem on our new partition.

Creating a Filesystem on an RHEL 6 Disk Partition

We now have a new disk installed, it is visible to RHEL 6 and we have configured a Linux partition on the disk. The next step is to create a Linux file system on the partition so that the operating system can use it to store files and data. The easiest way to create a file system on a partition is to use the mkfs.ext4 utility which takes as arguments the label and the partition device:

# /sbin/mkfs.ext4 -L /backup /dev/sdb1
mke2fs 1.41.12 (17-May-2010)
Filesystem label=/backup
OS type: Linux
Block size=4096 (log=2)
Fragment size=4096 (log=2)
Stride=0 blocks, Stripe width=0 blocks
2097152 inodes, 8388352 blocks
419417 blocks (5.00%) reserved for the super user
First data block=0
Maximum filesystem blocks=4294967296
256 block groups
32768 blocks per group, 32768 fragments per group
8192 inodes per group
Superblock backups stored on blocks:
32768, 98304, 163840, 229376, 294912, 819200, 884736, 1605632, 2654208,
4096000, 7962624

Writing inode tables: done
Creating journal (32768 blocks): done
Writing superblocks and filesystem accounting information: done

This filesystem checkes automatically after 36 mounts or 180 days, whichever comes first.
Use tune2fs -c or -i to override.

Mounting a Filesystem

Now that we have created a new filesystem on the Linux partition of our new disk drive we need to mount it so that it is accessible. In order to do this we need to create a mount point. A mount point is simply a directory or folder into which the filesystem will be mounted. For the purposes of this example we will create a /backup directory to match our filesystem label (although it is not necessary that these values match):

# mkdir /backup


The filesystem may then be manually mounted using the mount command:

# mount /dev/sdb1 /backup

Running the mount command with no arguments shows us all currently mounted filesystems (including our new filesystem):

# mount
/dev/mapper/vg_rhel6-lv_root on / type ext4 (rw)
proc on /proc type proc (rw)
sysfs on /sys type sysfs (rw)
devpts on /dev/pts type devpts (rw,gid=5,mode=620)
tmpfs on /dev/shm type tmpfs (rw,rootcontext="system_u:object_r:tmpfs_t:s0")
/dev/sda1 on /boot type ext4 (rw)
none on /proc/sys/fs/binfmt_misc type binfmt_misc (rw)
sunrpc on /var/lib/nfs/rpc_pipefs type rpc_pipefs (rw)
/dev/sr0 on /media/RHEL_6.0 x86_64 Disc 1 type iso9660 (ro,nosuid,nodev,uhelper=udisks,uid=500,gid=500,iocharset=utf8,mode=0400,dmode=0500)
/dev/sdb1 on /backup type ext4 (rw)
Configuring RHEL 6 to Automatically Mount a Filesystem

In order to configure the system so that the new disk is automatically mounted at the time boot we need an entry to be added to the /etc/fstab file.

The below is the sample configuration file which shows an fstab file configured to automount our /backup partition:

/dev/mapper/vg_rhel6-lv_root / ext4 defaults 1 1
UUID=4a9886f5-9545-406a-a694-04a60b24df84 /boot ext4 defaults 1 2
/dev/mapper/vg_rhel6-lv_swap swap swap defaults 0 0
tmpfs /dev/shm tmpfs defaults 0 0
devpts /dev/pts devpts gid=5,mode=620 0 0
sysfs /sys sysfs defaults 0 0
proc /proc proc defaults 0 0
LABEL=/backup /backup ext4 defaults 1 2

Have a Question?