Cloud

Nagios 4.3.4: Adding Ubuntu 14.0/16.0/Debian Servers/Clients to Nagios Monitoring server

This article will help us to install Ubuntu Linux client connects using the NRPE (Nagios Remote Plugin Executor) which is used to execute on the client machines and sends the status of the services to the Nagios server.

Installing Dependencies and NRPE Client.

$ sudo apt-get update
$ sudo apt-get install nagios-nrpe-server nagios-plugins


Configure NRPE Client on Ubuntu

We needed to edit the NRPE configuration file on the client machine for which Nagios servers accept requests if the Nagios server IP is 192.168.1.200, then add this IP to should be added to the allowed host’s list.

Edit NRPE configuration file using vi or any other editor /etc/nagios/nrpe.cfg

$ sudo vi /etc/nagios/nrpe.cfg

Find the below line and make changes below

allowed_hosts=127.0.0.1, 192.168.1.200

We can add any Nagios servers which are allowed to monitor the client with comma-separated.

Now we have to restart the NRPE service. Now it’s ready to listen to requests from the Nagios server

$ sudo /etc/init.d/nagios-nrpe-server restart

Verify Connection to NRPE Configuration.

Let’s go to your Nagios 4.3.4 server and verify that your Nagios server can communicate with NRPE client services properly.

Execute the following command from the Nagios server plugin directory, and we are assuming that your NRPE client-server IP is 192.168.1.100.

$ check_nrpe -H 192.168.1.100
NRPE v2.15

Add Commands in the NRPE client configuration file for monitoring the services.

$ sudo vi /etc/nagios/nrpe.cfg
command[check_users]=/usr/lib/nagios/plugins/check_users -w 5 -c 10
command[check_load]=/usr/lib/nagios/plugins/check_load -w 15,10,5 -c 30,25,20
command[check_hda1]=/usr/lib/nagios/plugins/check_disk -w 20% -c 10% -p /dev/hda1
command[check_zombie_procs]=/usr/lib/nagios/plugins/check_procs -w 5 -c 10 -s Z
command[check_total_procs]=/usr/lib/nagios/plugins/check_procs -w 150 -c 200

Restart the NRPE client Services

Use the following commands to start/stop/restart NRPE client services.

Every time we do any changes in the configuration file we needed to restart the service

sudo service nagios-nrpe-server stop
sudo service nagios-nrpe-server start
sudo service nagios-nrpe-server restart

In order to monitor Linux clients, we needed to add these clients and edit 2 configuration files in the Nagios server

Login to the Nagios server

Step 1. Edit hosts.cfg file to add the Linux client and add the client configuration

# vi /usr/local/nagios/etc/hosts.cfg

define host{
use                             linux-box               ; Inherit default values from a template
host_name                  New linux    ; The name we're giving to this server
alias                           CentOS 6                ; A longer name for the server
address                      192.168.1.84            ; IP address of Remote Linux host
}

Step 2. Edit services.cfg file to add the Linux client host_name to the services which we want to monitor

#vi /usr/local/nagios/etc/services.cfg
define service{
       use                          generic-service
       host_name               Testbox,{ new_linux_machine_hostname_defined in hosts.cfg }
       service_description    CPU Load
       check_command       check_nrpe!check_load    
}
define service{
       use                     generic-service         host_name              Testbox
        service_description     0. UP-Time
        check_command           check_nrpe!check_uptime
        servicegroups                   Uptime  
        }
define service{

        use                     generic-service
         host_name              Testbox
        service_description     1. CPU Load
        check_command           check_nrpe!check_load
      
        }
define service{
        use                     generic-service
        host_name Testbox
        service_description     2. Total Processes
        check_command           check_nrpe!check_total_procs
        }
define service{
        use                             generic-service
        host_name                       Testbox
        service_description             4. Disk Drive Root Partition
        servicegroups                   Disk-Space
        check_command                   check_nrpe!check_disk
        }
define service{
        use                             generic-service
        host_name                       Testbox
        service_description             5. Memory Usage
       check_command                   check_nrpe!check_mem
        servicegroups                   Memory
         }

Needed to add the Hostname which is given in the hosts.cfg file for the services you want to monitor

Keywords: Nagios, Monitoring, Linux host, Adding Linux host, ubuntu client, Ubuntu NRPE

Nagios 4.3.4: Adding CentOS 6.x/7.x/8.x/Red hat 6.x/7.x/8.x server to Nagios Monitoring server

This article will help us to install Linux client connects using the NRPE (Nagios Remote Plugin Executor) which is used to execute on the client machines and sends the status to the Nagios server. 

Installing Dependencies

# yum install -y gcc glibc glibc-common gd gd-devel make net-snmp openssl-devel xinetd ntp openssl* nagios-nrpe*

Create a new Nagios user account and set a password.

# useradd nagios
# passwd Nagios

Nagios Plugins installation:

We needed to install Nagios plugins into the client so that it can execute the commands given by Nagios server

# mkdir /root/nagios
# cd /root/nagios
# wget https://www.nagios-plugins.org/download/nagios-plugins-2.1.1.tar.gz
# tar -xvf nagios-plugins-2.1.1.tar.gz
# cd nagios-plugins-2.1.1.tar.gz
# ./configure
# make
# make install
# service openssl restart
# service nrpe start

Add the permission to the Nagios user for /usr/local/nagios folders where the Nagios plugins are installed just now

# chown  nagios.nagios /usr/local/nagios
# chown -R nagios.nagios /usr/local/nagios/libexec

Installing NRPE client on Linux host:

NRPE allows you to remotely execute Nagios plugins on other Linux/Unix machines.

This allows you to monitor remote machine metrics (disk usage, CPU load, etc.). NRPE can also communicate with some of the Windows agent add-ons, so you can execute scripts and check metrics on remote Windows machines as well.

Same steps as above. First, create the folder:

# mkdir -p /usr/local/src/nrpe
# cd /usr/local/src/nrpe
# wget http://kent.dl.sourceforge.net/project/nagios/nrpe-2.x/nrpe-2.15/nrpe-2.15.tar.gz
# tar -xf nrpe-2.15.tar.gz
# cd nrpe-2.15

Because of an issue with the OpenSSL library folder, we need to use another path than /usr/lib:

#./configure --with-ssl=/usr/bin/openssl --with-SSL-lib=/usr/lib/x86_64-linux-gnu

Now make and make install:

# make all

Next, install the NRPE plugin daemon, and sample the daemon config file.

# make install-plugin
# make install-daemon
# make install-daemon-config

Install the NRPE daemon under xinetd as a service.

# make install-xinetd

Next, open /etc/services file add the following entry for the NRPE daemon at the bottom of the file.

# vi /etc/services
nrpe            5666/tcp                 NRPE

Restart the xinetd service.

# service xinetd restart

Verify NRPE Daemon Locally
Run the following command to verify the NRPE daemon working correctly under xinetd.

# netstat -at | grep nrpe
tcp        0      0 *:nrpe                      *:*                         LISTEN

Next, verify the NRPE daemon is functioning properly. Run the “check_nrpe” command that was installed earlier for testing purposes.

# /usr/local/nagios/libexec/check_nrpe -H localhost

You will get the following string on the screen, it shows you what version of NRPE is installed:

NRPE v2.15

In order to monitor Linux clients, we needed to add these clients and edit 2 configuration files in the Nagios server

Login to the Nagios server

Step 1. Edit hosts.cfg file to add the Linux client and add the client configuration

# vi /usr/local/nagios/etc/hosts.cfg

define host{
use                             linux-box               ; Inherit default values from a template
host_name                  New linux    ; The name we're giving to this server
alias                           CentOS 6                ; A longer name for the server
address                      192.168.1.84            ; IP address of Remote Linux host
}

Step 2. Edit services.cfg file to add the Linux client host_name to the services which we want to monitor

#vi /usr/local/nagios/etc/services.cfg
define service{
       use                          generic-service
       host_name               Testbox,{ new_linux_machine_hostname_defined in hosts.cfg }
       service_description    CPU Load
       check_command       check_nrpe!check_load    
}
define service{
       use                     generic-service         host_name              Testbox
        service_description     0. UP-Time
        check_command           check_nrpe!check_uptime
        servicegroups                   Uptime  
        }
define service{

        use                     generic-service
         host_name              Testbox
        service_description     1. CPU Load
        check_command           check_nrpe!check_load
      
        }
define service{
        use                     generic-service
        host_name Testbox
        service_description     2. Total Processes
        check_command           check_nrpe!check_total_procs
        }
define service{
        use                             generic-service
        host_name                       Testbox
        service_description             4. Disk Drive Root Partition
        servicegroups                   Disk-Space
        check_command                   check_nrpe!check_disk
        }
define service{
        use                             generic-service
        host_name                       Testbox
        service_description             5. Memory Usage
       check_command                   check_nrpe!check_mem
        servicegroups                   Memory
         }

Needed to add the Hostname which is given in the hosts.cfg file for the services you want to monitor

Step 3. Finally, verify Nagios Configuration files for any errors and restart the Nagios services

#/usr/local/nagios/bin/nagios -v /usr/local/nagios/etc/nagios.cfg
# service nagios restart

Now go to Nagios Monitoring Web interface at “http://Your-server-IP-address/nagios” or “http://FQDN/nagios”

Nagios 4.1.1 other links:


Keywords: Nagios, Monitoring, Linux host, Adding Linux host

Nagios 4.3.4: Adding graphs to Nagios Core.

Nagios Graphs

In this article we will be adding graphs to the Nagios server that will allow monitoring the services and hosts performance in the past, these graphs can be monitored for Day, Week, Month and Yearly

Assuming that you have already configured the Nagios 4.3.4 Core Server if not follow this link to configure

Create a folder for the source:

# mkdir -p /usr/local/src/nagiosgraph/
# cd /usr/local/src/nagiosgraph/

Download the latest version:

# wget http://downloads.sourceforge.net/project/nagiosgraph/nagiosgraph/1.5.2/nagiosgraph-1.5.2.tar.gz
# tar -xf nagiosgraph-1.5.2.tar.gz
# cd nagiosgraph-1.5.2

Installing the dependencies for Nagios Graphs in the Nagios server

# yum install perl-rrd* perl-GD* perl-CPAN

Configure Nagios::Config: FAIL

# perl -MCPAN -e shell
Press enter for all the prompts till we get cpan[1]> prompt
cpan[1]> install Nagios::Config
Press enter for all the prompts till we get cpan[1]> prompt
type \quit to get into shell prompt

Check that we have all the dependencies installed:

# ./install.pl --check-prereq
Output:
checking required PERL modules
  Carp...1.29
  CGI...3.64
  Data::Dumper...2.145
  Digest::MD5...2.52
  File::Basename...2.84
  File::Find...1.23
  MIME::Base64...3.13
  POSIX...1.32
  RRDs...1.4007
  Time::HiRes...1.9725
checking optional PERL modules  GD...2.46
checking nagios installation
  found nagios exectuable at /usr/local/nagios/bin/nagios
checking web server installation
  found apache executable at /usr/sbin/apache2
  found apache init script at /etc/init.d/apache2

Start the installation:

# ./install.pl --layout standalone --prefix /usr/local/nagiosgraph
Give the default answer to all the questions except the below one:
Modify the Nagios configuration? [n] y
Path of Nagios commands file? /usr/local/nagios/etc/objects/commands.cfg
Modify the Apache configuration? [n] y

Create the Apache configuration file at this location “/usr/local/nagiosgraph/etc/”,  so that we can get the Nagios graphs from the URL, below are the commands to create the file and edit with the below contents.

# touch /usr/local/nagiosgraph/etc/nagiosgraph-apache.conf
# vi /usr/local/nagiosgraph/etc/nagiosgraph-apache.conf

Add the following to the file:

# enable nagiosgraph CGI scripts
ScriptAlias /nagiosgraph/cgi-bin "/usr/local/nagiosgraph/cgi"
<Directory "/usr/local/nagiosgraph/cgi">
     Options ExecCGI
     AllowOverride None
     Require all granted
</Directory>
# enable nagiosgraph CSS and JavaScript
Alias /nagiosgraph "/usr/local/nagiosgraph/share"
<Directory "/usr/local/nagiosgraph/share">
    Options None
    AllowOverride None
    Require all granted
</Directory>

Restart Nagios and Apache:

# service nagios restart
# service apache2 restart

You can now view the graphs at https://you-ip-address/nagiosgraph/cgi-bin/show.cgi.

We can integrate these graphs into Nagios with a little hack. Nagios supports notes_url and action_url. These can be put per host/service in the Nagios config and allow for a link to an internal knowledge base article or a procedure page or whatever for that host.

We can also place a javascript URL to the graphs there. Place this inside any service check: in windows.cfg, localhost.cfg, services.cfg files which are located in /usr/local/nagios/etc folder

action_url      /nagiosgraph/cgi-bin/show.cgi?host=$HOSTNAME
 
amp;service=$SERVICEDESC
 
amp;geom=1000x200' onMouseOver='showGraphPopup(this)' onMouseOut='hideGraphPopup()' rel='/nagiosgraph/cgi-bin/showgraph.cgi?host=$HOSTNAME
 
amp;service=$SERVICEDESC$

For example, the Load of the system:

# vi /usr/local/nagios/etc/objects/localhost.cfg
define service {
        use                              local-service
        host_name                  localhost
        service_description    Load
        check_command           check_local_load!5.0,4.0,3.0!10.0,6.0,4.0
        action_url              /nagiosgraph/cgi-bin/show.cgi?host=$HOSTNAME
 
amp;service=$SERVICEDESC
 
amp;geom=1000x200' onMouseOver='showGraphPopup(this)' onMouseOut='hideGraphPopup()' rel='/nagiosgraph/cgi-bin/showgraph.cgi?host=$HOSTNAME
 
amp;service=$SERVICEDESC$ }

For the ping check you can show both RTA and packet loss:

define service {
        use                     local-service
        host_name               localhost
        service_description     PING
        check_command           check_ping!100.0,20%!500.0,60%
        action_url              /nagiosgraph/cgi-bin/show.cgi?host=$HOSTNAME
 
amp;service=$SERVICEDESC
 
amp;db=pl,data&db=pl,warn&db=pl,crit&geom=1000x200' onMouseOver='showGraphPopup(this)' onMouseOut='hideGraphPopup()' rel='/nagiosgraph/cgi-bin/showgraph.cgi?host=$HOSTNAME
 
amp;service=$SERVICEDESC
 
amp;db=pl,data&db=pl,warn&db=pl,crit }

We need to include the Nagios Graph Javascript in Nagios to make sure the mouseover works. Edit or create the following file:

# vi /usr/local/nagios/share/ssi/common-header.ssi

Place the following in there:

/nagiosgraph/nagiosgraph.js

Now save and reload Nagios:

# service nagios restart


Keywords: Nagios, Monitoring, Linux host, Adding Linux host, Nagios Graph, MRTG Graphs, Nagios MRTG Graphs

How to install Nagios Core 4.3.4 on CentOS 7.x/8.x

In this article, we will learn about how to install Nagios Core 4.3.3& Nagios Core plugins versions 2.2.1.

Nagios Core 4.3.3 is an Open source monitoring application tool that will monitor the Servers, Network firewalls, switches, and printers which also send notifications for the hosts, services and send notifications for the warning, critical levels send a notification once the services are hosts are recovered.

Nagios also provides the information on s single web interface and sends the notifications whenever there is a threshold according to the configuration we did for CPU utilization, Disk utilization which also supports for no of ports like HTTP, SNMP, ICMP, FTP, SSH, SMTP, POP3.

Installing the dependencies.

Before we proceed further we will first install all the dependencies packages like PHP, Apache, and other packages required to run the Nagios Core 4.2.1

[root@localhost ~]# yum install httpd php gcc glibc glibc-comman gd gd-devel make net-snmp unzip –y
Output:
Loaded plugins: fastestmirror
Loading mirror speeds from cached hostfile
* base: ftp.iitm.ac.in
* extras: ftp.iitm.ac.in
* updates: mirrors.nhanhoa.com
Package httpd-2.4.6-67.el7.centos.5.x86_64 already installed and latest version
Package php-5.4.16-42.el7.x86_64 already installed and latest version
Package gcc-4.8.5-16.el7.x86_64 already installed and latest version
Package glibc-2.17-196.el7.x86_64 already installed and latest version
No package glibc-comman available.
Package gd-2.0.35-26.el7.x86_64 already installed and latest version
Package gd-devel-2.0.35-26.el7.x86_64 already installed and latest version
Package 1:make-3.82-23.el7.x86_64 already installed and latest version
Package 1:net-snmp-5.7.2-28.el7.x86_64 already installed and latest version
Package unzip-6.0-16.el7.x86_64 already installed and latest version
Resolving Dependencies
…
--> Processing Dependency: grub2-common = 1:2.02-0.64.el7.centos for package: 1:grub2-tools-2.02-0.64.el7.centos.x86_64
---> Package grub2-tools-efi.x86_64 1:2.02-0.64.el7.centos will be obsoleting
---> Package grub2-tools-extra.x86_64 1:2.02-0.64.el7.centos will be obsoleting
---> Package grub2-tools-minimal.x86_64 1:2.02-0.64.el7.centos will be obsoleting
---> Package grubby.x86_64 0:8.28-21.el7_3 will be updated
---> Package grubby.x86_64 0:8.28-23.el7 will be an update
---> Package gsettings-desktop-schemas.x86_64 0:3.14.2-1.el7 will be updated
---> Package gsettings-desktop-schemas.x86_64 0:3.22.0-1.el7 will be an update
---> Package gzip.x86_64 0:1.5-8.el7 will be updated
---> Package gzip.x86_64 0:1.5-9.el7 will be an update
---> Package haproxy.x86_64 0:1.5.18-3.el7_3.1 will be updated
Downloading packages:
(1/30): freetype-devel-2.4.11-15.el7.x86_64.rpm                                                                                | 356 kB  00:00:00
(2/30): cpp-4.8.5-16.el7.x86_64.rpm                                                                                            | 5.9 MB  00:00:01
(3/30): gd-2.0.35-26.el7.x86_64.rpm                                                                                            | 146 kB  00:00:00
(4/30): gd-devel-2.0.35-26.el7.x86_64.rpm                                                                                      |  79 kB  00:00:00
(5/30): glibc-devel-2.17-196.el7.x86_64.rpm                                                                                    | 1.1 MB  00:00:00
(6/30): glibc-headers-2.17-196.el7.x86_64.rpm                                                                                  | 675 kB  00:00:00
(7/30): kernel-headers-3.10.0-693.2.2.el7.x86_64.rpm                                                                           | 6.0 MB  00:00:00
(8/30): libX11-devel-1.6.5-1.el7.x86_64.rpm                                                                                    | 980 kB  00:00:00
(9/30): libXau-devel-1.0.8-2.1.el7.x86_64.rpm                                                                                  |  14 kB  00:00:00
(10/30): libXpm-3.5.12-1.el7.x86_64.rpm                                                                                        |  55 kB  00:00:00
(11/30): libXpm-devel-3.5.12-1.el7.x86_64.rpm                                                                                  |  36 kB  00:00:00
(12/30): fontconfig-devel-2.10.95-11.el7.x86_64.rpm                                                                            | 128 kB  00:00:02
(13/30): libXt-1.1.5-3.el7.x86_64.rpm                                                                                          | 173 kB  00:00:00
(14/30): gcc-4.8.5-16.el7.x86_64.rpm                                                                                           |  16 MB  00:00:02
(15/30): libjpeg-turbo-devel-1.2.90-5.el7.x86_64.rpm                                                                           |  98 kB  00:00:00
(16/30): libpng-devel-1.5.13-7.el7_2.x86_64.rpm                                                                                                           | 122 kB  00:00:00
(17/30): libmpc-1.0.1-3.el7.x86_64.rpm                                                                                                                    |  51 kB  00:00:00

(18/30): libxcb-devel-1.12-1.el7.x86_64.rpm                                                                                                               | 1.0 MB  00:00:00

(19/30): libzip-0.10.1-8.el7.x86_64.rpm                                                                                                                   |  48 kB  00:00:00

(20/30): lm_sensors-libs-3.4.0-4.20160601gitf9185e5.el….
….
Installed:
  gcc.x86_64 0:4.8.5-16.el7  gd.x86_64 0:2.0.35-26.el7  gd-devel.x86_64 0:2.0.35-26.el7  net-snmp.x86_64 1:5.7.2-28.el7  php.x86_64 0:5.4.16-42.el7  unzip.x86_64 0:6.0-16.el7
Dependency Installed:
  cpp.x86_64 0:4.8.5-16.el7                            fontconfig-devel.x86_64 0:2.10.95-11.el7                           freetype-devel.x86_64 0:2.4.11-15.el7
  glibc-devel.x86_64 0:2.17-196.el7                    glibc-headers.x86_64 0:2.17-196.el7                                kernel-headers.x86_64 0:3.10.0-693.2.2.el7
  libX11-devel.x86_64 0:1.6.5-1.el7                    libXau-devel.x86_64 0:1.0.8-2.1.el7                                libXpm.x86_64 0:3.5.12-1.el7
  libXpm-devel.x86_64 0:3.5.12-1.el7                   libXt.x86_64 0:1.1.5-3.el7                                         libjpeg-turbo-devel.x86_64 0:1.2.90-5.el7
  libmpc.x86_64 0:1.0.1-3.el7                          libpng-devel.x86_64 2:1.5.13-7.el7_2                               libxcb-devel.x86_64 0:1.12-1.el7
  libzip.x86_64 0:0.10.1-8.el7                         lm_sensors-libs.x86_64 0:3.4.0-4.20160601gitf9185e5.el7            mpfr.x86_64 0:3.1.1-4.el7
  net-snmp-agent-libs.x86_64 1:5.7.2-28.el7            net-snmp-libs.x86_64 1:5.7.2-28.el7                                perl-Data-Dumper.x86_64 0:2.145-3.el7
  php-cli.x86_64 0:5.4.16-42.el7                       php-common.x86_64 0:5.4.16-42.el7                                  xorg-x11-proto-devel.noarch 0:7.7-20.el7
Complete!

Downloading the Nagios Core 4.3.2 Packages.

Once the dependencies are installed we will download the Nagios Core 4.3.3 and Nagios plugins 2.2.1 from the Nagios office repository.

Nagios Core 4.3.3
[root@localhost ~]#  wget https://sourceforge.net/projects/nagios/files/nagios-4.x/nagios-4.3.4/nagios-4.3.4.tar.gz
--2017-10-13 07:09:11--  https://sourceforge.net/projects/nagios/files/nagios-4.x/nagios-4.3.4/nagios-4.3.4.tar.gz
Resolving sourceforge.net (sourceforge.net)... 216.34.181.60
Connecting to sourceforge.net (sourceforge.net)|216.34.181.60|:443... connected.
HTTP request sent, awaiting response... 302 Found
Location: https://sourceforge.net/projects/nagios/files/nagios-4.x/nagios-4.3.4/nagios-4.3.4.tar.gz/download [following]
--2017-10-13 07:09:12--  https://sourceforge.net/projects/nagios/files/nagios-4.x/nagios-4.3.4/nagios-4.3.4.tar.gz/download
Connecting to sourceforge.net (sourceforge.net)|216.34.181.60|:443... connected.
HTTP request sent, awaiting response... 302 Found
Location: https://downloads.sourceforge.net/project/nagios/nagios-4.x/nagios-4.3.4/nagios-4.3.4.tar.gz?r=&ts=1507892953&use_mirror=excellmedia [following]
--2017-10-13 07:09:13--  https://downloads.sourceforge.net/project/nagios/nagios-4.x/nagios-4.3.4/nagios-4.3.4.tar.gz?r=&ts=1507892953&use_mirror=excellmedia
Resolving downloads.sourceforge.net (downloads.sourceforge.net)... 216.34.181.59
Connecting to downloads.sourceforge.net (downloads.sourceforge.net)|216.34.181.59|:443... connected.
HTTP request sent, awaiting response... 302 Found
Location: https://excellmedia.dl.sourceforge.net/project/nagios/nagios-4.x/nagios-4.3.4/nagios-4.3.4.tar.gz [following]
--2017-10-13 07:09:14--  https://excellmedia.dl.sourceforge.net/project/nagios/nagios-4.x/nagios-4.3.4/nagios-4.3.4.tar.gz
Resolving excellmedia.dl.sourceforge.net (excellmedia.dl.sourceforge.net)... 202.153.32.19
Connecting to excellmedia.dl.sourceforge.net (excellmedia.dl.sourceforge.net)|202.153.32.19|:443... connected.
HTTP request sent, awaiting response... 200 OK
Length: 11096863 (11M) [application/x-gzip]
Saving to: ‘nagios-4.3.4.tar.gz’
100%[=======================================================================================================================================>] 11,096,863   319KB/s   in 37s
2017-10-13 07:09:53 (295 KB/s) - ‘nagios-4.3.4.tar.gz’ saved [11096863/11096863]
Nagios Plugins 2.2.1
# wget https://nagios-plugins.org/download/nagios-plugins-2.2.1.tar.gz
--2017-10-13 07:10:38--  https://nagios-plugins.org/download/nagios-plugins-2.2.1.tar.gz
Resolving nagios-plugins.org (nagios-plugins.org)... 72.14.186.43
Connecting to nagios-plugins.org (nagios-plugins.org)|72.14.186.43|:443... connected.
HTTP request sent, awaiting response... 200 OK
Length: 2728818 (2.6M) [application/x-gzip]
Saving to: ‘nagios-plugins-2.2.1.tar.gz’
100%[=======================================================================================================================================>] 2,728,818   1.44MB/s   in 1.8s
2017-10-13 07:10:41 (1.44 MB/s) - ‘nagios-plugins-2.2.1.tar.gz’ saved [2728818/2728818]

Once the files are downloaded we will extract the files using the below command.

[root@localhost ~]# tar -zxpvf nagios-plugins-2.2.1.tar.gz
[root@localhost ~]# tar -zxvf nagios-4.3.4.tar.gz

Creating Nagios User and Group.

As we needed to create a user Nagios and a group called nagcmd for running the Nagios and give user permissions on the group and apache.

[root@localhost ~]# groupadd nagcmd
[root@localhost ~]# useradd nagios
[root@localhost ~]# passwd nagios
Changing password for user nagios.
New password:
Retype new password:
passwd: all authentication tokens updated successfully.
[root@localhost ~]# usermod -G nagcmd nagios
[root@localhost ~]# usermod -G nagcmd apache

Installing Nagios Core 4.3.3

Now we will install the Nagios Core 4.3.3 by changing the director to Nagios core install directory and running the below command.

[root@localhost ~]# cd nagios-4.3.4
[root@localhost nagios-4.3.4]# ./configure --with-command-group=nagcmd
./configure --with-command-group=nagcmd
checking for a BSD-compatible install... /usr/bin/install -c
checking build system type... x86_64-pc-linux-gnu
checking host system type... x86_64-pc-linux-gnu
checking for gcc... gcc
checking whether the C compiler works... yes
checking for C compiler default output file name... a.out
checking for suffix of executables...
checking whether we are cross compiling... no
checking for suffix of object files... o
checking whether we are using the GNU C compiler... yes
checking whether gcc accepts -g... yes
checking for gcc option to accept ISO C89... none needed
checking whether make sets $(MAKE)... yes
checking whether ln -s works... yes
checking for strip... /usr/bin/strip
checking how to run the C preprocessor... gcc -E
checking for grep that handles long lines and -e... /usr/bin/grep
…
…
*** Configuration summary for nagios 4.3.2 2017-05-09 ***:
 General Options:
-------------------------
        Nagios executable:  nagios
        Nagios user/group:  nagios,nagios
       Command user/group:  nagios,nagcmd
             Event Broker:  yes
        Install ${prefix}:  /usr/local/nagios
    Install ${includedir}:  /usr/local/nagios/include/nagios
                Lock file:  ${prefix}/var/nagios.lock
   Check result directory:  ${prefix}/var/spool/checkresults
           Init directory:  /etc/rc.d/init.d
  Apache conf.d directory:  /etc/httpd/conf.d
             Mail program:  /bin/mail
                  Host OS:  linux-gnu
          IOBroker Method:  epoll
 Web Interface Options:
 ------------------------
                 HTML URL:  http://localhost/nagios/
                  CGI URL:  http://localhost/nagios/cgi-bin/
 Traceroute (used by WAP):
Review the options above for accuracy.  If they look okay,
type 'make all' to compile the main program and CGIs.
Now we will compile the main programs using the below commands


[root@localhost nagios-4.3.4]# make all
cd ./base && make
make[1]: Entering directory `/root/nagios-4.3.4/base'
gcc -Wall -I.. -g -O2 -DHAVE_CONFIG_H -DNSCORE -c -o nagios.o nagios.c
gcc -Wall -I.. -g -O2 -DHAVE_CONFIG_H -DNSCORE   -c -o broker.o broker.c
gcc -Wall -I.. -g -O2 -DHAVE_CONFIG_H -DNSCORE   -c -o nebmods.o nebmods.c
gcc -Wall -I.. -g -O2 -DHAVE_CONFIG_H -DNSCORE -c -o ../common/shared.o ../common/shared.c
gcc -Wall -I.. -g -O2 -DHAVE_CONFIG_H -DNSCORE   -c -o nerd.o nerd.c
gcc -Wall -I.. -g -O2 -DHAVE_CONFIG_H -DNSCORE   -c -o query-handler.o query-handler.c
gcc -Wall -I.. -g -O2 -DHAVE_CONFIG_H -DNSCORE -c -o workers.o workers.c
gcc -Wall -I.. -g -O2 -DHAVE_CONFIG_H -DNSCORE   -c -o checks.o checks.c
..
..
make[1]: Leaving directory `/root/nagios-4.3.4/worker'
*** Compile finished ***
If the main program and CGIs compiled without any errors, you
can continue with installing Nagios as follows (type 'make'
without any arguments for a list of all possible options):
  make install
     - This installs the main program, CGIs, and HTML files
  make install-init
     - This installs the init script in /etc/rc.d/init.d
  make install-commandmode
     - This installs and configures permissions on the
       directory for holding the external command file
  make install-config
     - This installs *SAMPLE* config files in /usr/local/nagios/etc
       You'll have to modify these sample files before you can
       use Nagios.  Read the HTML documentation for more info
       on doing this.  Pay particular attention to the docs on
       object configuration files, as they determine what/how
       things get monitored!
  make install-webconf
     - This installs the Apache config file for the Nagios
       web interface
  make install-exfoliation
     - This installs the Exfoliation theme for the Nagios web interface
  make install-classicui
     - This installs the classic theme for the Nagios web interface
*** Support Notes *******************************************
If you have questions about configuring or running Nagios,
please make sure that you:
..
..


Once the Nagios files compete we needed to init scripts, make Nagios work from CLI, and also install some sample config files, a config web interface to run the Nagios from web browsers.

[root@localhost nagios-4.3.4]# make install-init
/usr/bin/install -c -m 755 -d -o root -g root /etc/rc.d/init.d
/usr/bin/install -c -m 755 -o root -g root daemon-init /etc/rc.d/init.d/nagios
*** Init script installed ***
[root@localhost nagios-4.3.4]# make install-commandmode
/usr/bin/install -c -m 775 -o nagios -g nagcmd -d /usr/local/nagios/var/rw
chmod g+s /usr/local/nagios/var/rw
*** External command directory configured ***
[root@localhost nagios-4.3.4]# make install-config
/usr/bin/install -c -m 775 -o nagios -g nagios -d /usr/local/nagios/etc
/usr/bin/install -c -m 775 -o nagios -g nagios -d /usr/local/nagios/etc/objects
/usr/bin/install -c -b -m 664 -o nagios -g nagios sample-config/nagios.cfg /usr/local/nagios/etc/nagios.cfg
/usr/bin/install -c -b -m 664 -o nagios -g nagios sample-config/cgi.cfg /usr/local/nagios/etc/cgi.cfg
/usr/bin/install -c -b -m 660 -o nagios -g nagios sample-config/resource.cfg /usr/local/nagios/etc/resource.cfg
/usr/bin/install -c -b -m 664 -o nagios -g nagios sample-config/template-object/templates.cfg /usr/local/nagios/etc/objects/templates.cfg
/usr/bin/install -c -b -m 664 -o nagios -g nagios sample-config/template-object/commands.cfg /usr/local/nagios/etc/objects/commands.cfg
/usr/bin/install -c -b -m 664 -o nagios -g nagios sample-config/template-object/contacts.cfg /usr/local/nagios/etc/objects/contacts.cfg
/usr/bin/install -c -b -m 664 -o nagios -g nagios sample-config/template-object/timeperiods.cfg /usr/local/nagios/etc/objects/timeperiods.cfg
/usr/bin/install -c -b -m 664 -o nagios -g nagios sample-config/template-object/localhost.cfg /usr/local/nagios/etc/objects/localhost.cfg
/usr/bin/install -c -b -m 664 -o nagios -g nagios sample-config/template-object/windows.cfg /usr/local/nagios/etc/objects/windows.cfg
/usr/bin/install -c -b -m 664 -o nagios -g nagios sample-config/template-object/printer.cfg /usr/local/nagios/etc/objects/printer.cfg
/usr/bin/install -c -b -m 664 -o nagios -g nagios sample-config/template-object/switch.cfg /usr/local/nagios/etc/objects/switch.cfg
*** Config files installed ***
Remember, these are *SAMPLE* config files.  You'll need to read
the documentation for more information on how to actually define
services, hosts, etc. to fit your particular needs.


[root@localhost nagios-4.3.4]# make install-webconf
/usr/bin/install -c -m 644 sample-config/httpd.conf /etc/httpd/conf.d/nagios.conf
if [ 0 -eq 1 ]; then \
        ln -s /etc/httpd/conf.d/nagios.conf /etc/apache2/sites-enabled/nagios.conf; \
fi
*** Nagios/Apache conf file installed ***

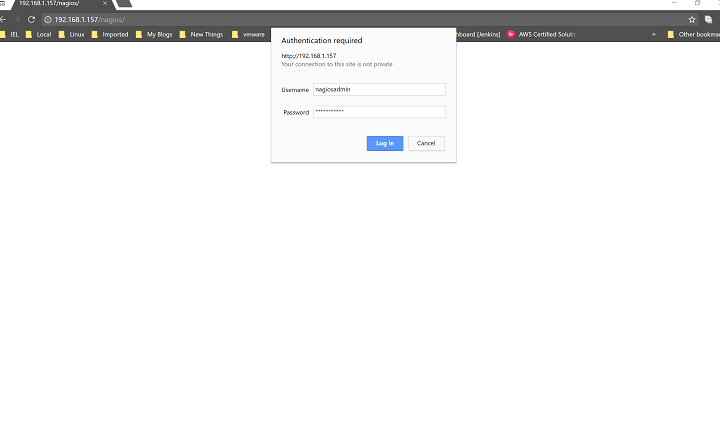
Once the web interface is installed and configured on the Apache we needed to create a default username we called it ‘nagiosadmin’ and create a password for the user herein demo purposes we will create the same as the username, below is the command to create the use and password for the user

[root@localhost nagios-4.3.4]# htpasswd -s -c /usr/local/nagios/etc/htpasswd.users nagiosadmin
New password:
Re-type new password:
Adding password for user nagiosadmin

Configure the email alerts for sending Notifications from Nagios.

This is an optional step but if we can do it this will help us to get the notifications and email alerts if something goes wrong with the servers and machines we monitor. We needed to update the email id in the area where it is highlighted with red.

[root@localhost nagios-4.3.4]# vi /usr/local/nagios/etc/objects/contacts.cfg
###############################################################################
# CONTACTS.CFG - SAMPLE CONTACT/CONTACTGROUP DEFINITIONS
#
#
# NOTES: This config file provides you with some example contact and contact
#        group definitions that you can reference in host and service
#        definitions.
#
#        You don't need to keep these definitions in a separate file from your
#        other object definitions.  This has been done just to make things
#        easier to understand.
#
###############################################################################
###############################################################################
###############################################################################
#
# CONTACTS
#
###############################################################################
###############################################################################
# Just one contact defined by default - the Nagios admin (that's you)
# This contact definition inherits a lot of default values from the 'generic-contact'
# template which is defined elsewhere.

define contact{
        contact_name                    nagiosadmin             ; Short name of user
        use                             generic-contact         ; Inherit default values from generic-contact template (defined above)
        alias                           Nagios Admin            ; Full name of user
        email                           nagios@localhost        ; <<***** CHANGE THIS TO YOUR EMAIL ADDRESS ******
        }
###############################################################################

###############################################################################
#
# CONTACT GROUPS
#
"/usr/local/nagios/etc/objects/contacts.cfg" 54L, 2138C
...
...

Nagios Plugins Installation.

Once the core is ready and configured we will now install the Nagios plugins

[root@localhost nagios-plugins-2.2.1]# ./configure --with-nagios-user=nagios --with-nagios-group=Nagios
checking for a BSD-compatible install... /usr/bin/install -c
checking whether build environment is sane... yes
checking for a thread-safe mkdir -p... /usr/bin/mkdir -p
checking for gawk... gawk
checking whether make sets $(MAKE)... yes
checking whether to disable maintainer-specific portions of Makefiles... yes
checking build system type... x86_64-unknown-linux-gnu
checking host system type... x86_64-unknown-linux-gnu
checking for gcc... gcc
checking for C compiler default output file name... a.out
checking whether the C compiler works... yes
checking whether we are cross compiling... no
checking for suffix of executables...
checking for suffix of object files... o
checking whether we are using the GNU C compiler... yes
checking whether gcc accepts -g... yes
checking for gcc option to accept ISO C89... none needed
checking for style of include used by make... GNU
checking dependency style of gcc... gcc3
..
..
configure: creating ./config.status
config.status: creating gl/Makefile
config.status: creating nagios-plugins.spec
config.status: creating tools/build_perl_modules
config.status: creating Makefile
config.status: creating tap/Makefile
config.status: creating lib/Makefile
config.status: creating plugins/Makefile
config.status: creating lib/tests/Makefile
config.status: creating plugins-root/Makefile
config.status: creating plugins-scripts/Makefile
config.status: creating plugins-scripts/utils.pm
config.status: creating plugins-scripts/utils.sh
config.status: creating perlmods/Makefile
config.status: creating test.pl
config.status: creating pkg/solaris/pkginfo
config.status: creating po/Makefile.in
config.status: creating config.h
config.status: config.h is unchanged
config.status: executing depfiles commands
config.status: executing libtool commands
config.status: executing po-directories commands
config.status: creating po/POTFILES
config.status: creating po/Makefile
[root@localhost nagios-plugins-2.2.1]# make
[root@localhost nagios-plugins-2.2.1]# make install

Verifying the Nagios Configuration files

Once the plugins are installed we will verify the Nagios configuration to make sure that everything is working fine needed to restart the Nagios daemon.

[root@localhost nagios-plugins-2.2.1]# /usr/local/nagios/bin/nagios -v /usr/local/nagios/etc/nagios.cfg
Nagios Core 4.3.3
Copyright (c) 2009-present Nagios Core Development Team and Community Contributors
Copyright (c) 1999-2009 Ethan Galstad
Last Modified: 2017-05-09
License: GPL
Website: https://www.nagios.org
Reading configuration data...
   Read main config file okay...
   Read object config files okay...
Running pre-flight check on configuration data...
Checking objects...
        Checked 8 services.
        Checked 1 hosts.
        Checked 1 host groups.
        Checked 0 service groups.
        Checked 1 contacts.
        Checked 1 contact groups.
        Checked 24 commands.
        Checked 5 time periods.
        Checked 0 host escalations.
        Checked 0 service escalations.
Checking for circular paths...
        Checked 1 hosts
        Checked 0 service dependencies
        Checked 0 host dependencies
        Checked 5 timeperiods
Checking global event handlers...
Checking obsessive compulsive processor commands...
Checking misc settings...
Total Warnings: 0
Total Errors:   0
Things look okay - No serious problems were detected during the pre-flight check


If we have not found any errors or warnings we will restart the Nagios & httpd and enable them to start at the server startup.

[root@localhost nagios-plugins-2.2.1]# systemctl restart nagios

[root@localhost nagios-plugins-2.2.1]# systemctl restart httpd

[root@localhost nagios-plugins-2.2.1]# systemctl enable nagios

nagios.service is not a native service, redirecting to /sbin/chkconfig.

Executing /sbin/chkconfig nagios on

[root@localhost nagios-plugins-2.2.1]# systemctl enable httpd

Created symlink from /etc/systemd/system/multi-user.target.wants/httpd.service to /usr/lib/systemd/system/httpd.service.

Nagios Web-interface.

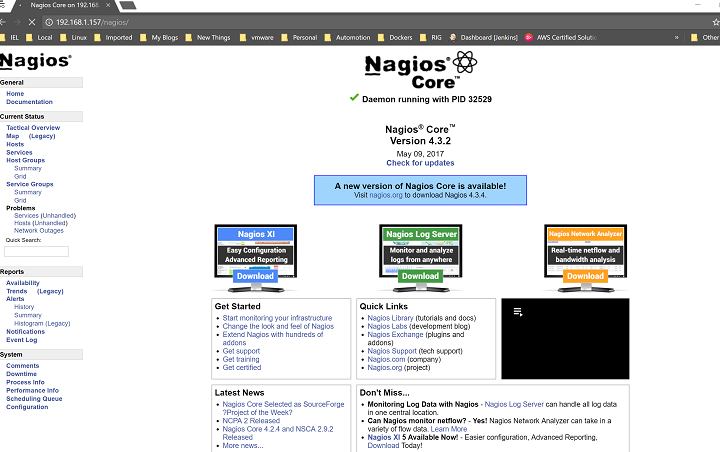
As everything is configured we will now check the web interface of Nagios using the user ‘nagiosadmin’.

Access the web browser using the URL http://IP-Address/nagios

Login Page.

nagios core 4.3.2-1

Home Page for Nagios Core 4.3.4
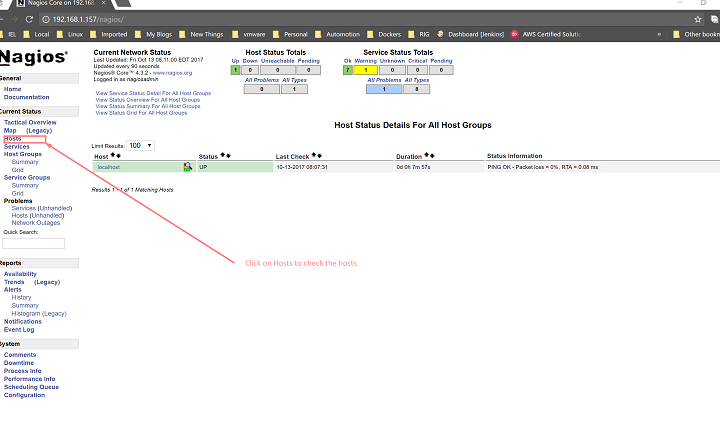
nagios core 4.3.2-2.png

Nagios HOSTS page

nagios core 4.3.2-3.png

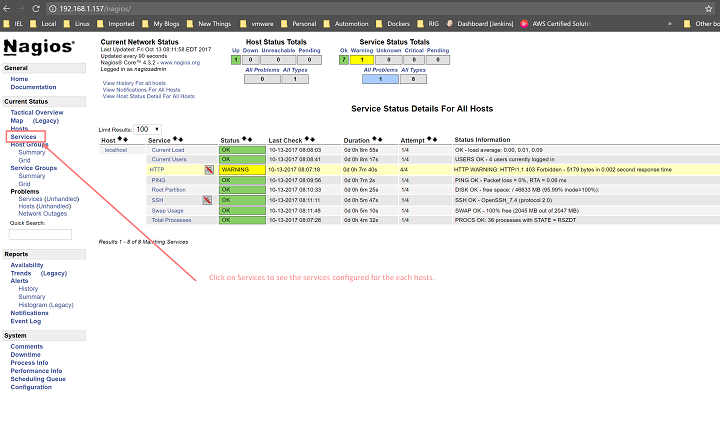
Nagios Services Page

nagios core 4.3.2-4

In the above article we have learned about how to install the Nagios Core 4.3.4, Nagios Plugins 2.2.1,  created Nagios admin user, init, web-interface, etc.


AWS – An Introduction to the Cloud

What is AWS (Amazon Web Servers)?

In the year of 2006 Amazon has started their AWS (Amazon Web Servers) IT services in the market in the form of web servers which is popularly know as cloud computing, where we no needed to plan for the IT infrastructure which consumes the time in advance where now the IT infrastructure can be spin up instantly and results very faster.  Where we pay only for that what we use and no up-front cost and no longer commitments which made the AWS very efficient in cost wise.

What is a Cloud Computing?

Cloud computing is a web-based or Internet-based computing services where remotely hosted servers are networked in a centralized location with huge data storage and online resources to be accessed remotely.

Instead of building their own infrastructure we can use the shared computing and storage.

  • Where the users can be the provision with resources on-demand and release the resources.
  • Users can access the network with a proper security.
  • Users can access the resources and pay with the pay-as-you-go model and they will be charged on the type of resource and usage.

Advantages of Cloud Computing.

Easy Access to the Information –  We can access our data or information once registered on the cloud, we can access the account and data from anywhere in the world where we have the internet connection.

Cost-Efficient –  Having the own servers and tools is time-consuming and expensive, where we needed to order the infrastructure, pay, configure and install them long before and test the infrastructure, whereas the cloud computing is already tested by the service provider and we only pay for the services we use.

Reliability – The cloud computing provided a manageable, reliable and consistent service then that of in-house Infrastructure, where the cloud guarantees 24×7 and 365 days of service if something fails the hosted applications and services are easily transferred to the next available servers.

Unlimited Storage – Cloud computing will provide almost an unlimited storage, we needed not to worry about the outage of storage space, we can also access as much less as we needed.

Backup and Recovery – The cloud computing provides a good backup and restore the same date with easier storing, the service providers have enough technology to get recover the data with a convenient recovering with the simple click anytime we needed.

Cloud types:

Basically, there are three type of clouds available (Public, Private and Hybrid cloud)

Public Cloud: A Third party service providers provide the resources and services on their owned data center with structured infrastructure over the internet to the customers with security.


Private Cloud: A private cloud is data center, where the infrastructure is managed by the organization or by the third party for a customer’s organization, the infrastructure and security is maintained by the organization itself only.

Hybrid Cloud:  A Hybrid cloud is the combination of both Public and Private clouds, depends on their requirement, security, availability, and sensitivity of the data and application they decide to run on the Public or Private cloud.

Model of the Cloud Services.

We have three types of cloud services IaaS, PaaS, SaaS.

Infrastructure as a Service (IaaS): The IaaS stands for Infrastructure as a service, which provides the users with the power of storage, processing and network connectivity on demand. Using this service model the users can develop, deploy their own applications on their instances or resources.

Platform as a Service (PaaS):  The PaaS stands for Platform as a Service, where the services provided  provides the different services databases, workflows, emails, queues . as a customer we can use these services and build our own applications and the resources and backups are handled by the service provider where it helps the customers only needed to focus on their applications.


Software as a Service(SaaS):  The SasS stands for Software as a Service, where the application is provided by a third-party service provider with some admin service capabilities at the application level such as creating users, giving access to some services to users, where the customer can customize the application such as logs, colors etc.

GCP: How to increase the disk space of Linux Machine

In this tutorial, we will learn how to expand or increase the Linux root volume without stopping/shutdown the instance or stopping any services on the Virtual Machine without restart.

In this, we have 2 steps to be followed.

  1. We have to change the volume size of the disk on Google console from disks Menu in GCP Cloud Compute.
  2. We have to increase the partition size on the Linux machine

Google Console Changes

  • Log in to the Google Console.
  • Click on Google Compute Menu and then goto disks
  • Find the disk on which we want to increase the disk space.gcp_disk1
  • Once the Edit, increase the size of the Volume to our need and Click on Size.

gcp_disk2

  • It will take around 5 – 8 min to increase the volume size on the Google console after some time we can see the increased size on the Google console.

Linux Instance Side.

  • Log in to the Instance using the Credentials and corresponding key pair.
  • Check the Existing disk space using the command df –h
$ df -h
Filesystem            Size  Used Avail Use% Mounted on
/dev/sda1             100G  90.1M  9.9  90% /
tmpfs                 1.9G     0  1.9G   0% /dev/shm
  • Change the login to root user by using sudo –i.
  • Run lsbk to show the block devices attached to the instance.
# lsbk
NAME    MAJ:MIN RM   SIZE RO TYPE MOUNTPOINT
sda    202:0    0   100 G  0 disk
└─sda1 202:1    0   100 G  0 part /

Here if we see that the block device sda has 100 GB attached and having 1 partition with 100  GB for the root

  • Run the growpart command to increase the root partition (/)
# growpart /dev/sda 1

The filesystem on /dev/sda1 is now 18350080 blocks long.

  • Finally, increase the root partition with resize command
# resize2fs /dev/sda1
resize2fs 1.42.3
   Filesystem at /dev/sda1 is mounted on /; on-line resizing required
    old_desc_blocks = 1, new_desc_blocks = 5
    Performing an on-line resize of /dev/sda1 to 18350080 (4k) blocks.
    The filesystem on /dev/sda1 is now 18350080 blocks long.
  • Now if we check the disk space using df, we can observe the disk space has been increased to a size we have extended on the Google Console.
# df -h
Filesystem            Size  Used Avail Use% Mounted on
/dev/sda1            150G  90.1M  60 G  69% /
tmpfs                 1.9G     0  1.9G   0% /dev/shm
AWS: Expanding the Linux root Volume without stopping/shutdown (online).

In this tutorial, we will learn how to expand or increase the Linux root volume without stopping/shutdown the instance or stopping any services on the instance without restart.

In this, we have 2 steps to be followed.

  1. We have to change the volume size on the AWS console.
  2. We have to increase the partition size on the Linux Instance.

AWS Console Changes

  • Log in to the AWS Console.
  • Click on EC2
  • Find the Instance on which we want to increase the volume.
  • Find the Root partition of the Instance in the description panel.

linux1

  • Click on the Root Device, which will show all the device information on the popup.

linux2

  • Click on EBI ID. This will take you to respective volume on EBS Volumes
  • Right-Click on the respective volume where we want to increase the disk space.
  • Click on Modify Volume.linux3
  • Once the Modify Volume pop-up, increase the size of the Volume to our need and Click on Modify.

linux4

  • It will take around 5 – 8 min to increase the volume size on the AWS console after some time we can see the increased size on the AWS console.

Linux Instance Side.

  • Log in to the Instance using the Credentials and corresponding key pair.
  • Check the Existing disk space using the command df –h
$ df -h
Filesystem            Size  Used Avail Use% Mounted on
/dev/xvda1            7.9G  7.1M  0.8G  90% /
tmpfs                 1.9G     0  1.9G   0% /dev/shm
  • Change the login to root user by using sudo –i.
  • Run lsbk to show the block devices attached to the instance.
# lsbk
NAME    MAJ:MIN RM   SIZE RO TYPE MOUNTPOINT
xvda    202:0    0   10 G  0 disk
└─xvda1 202:1    0   7.9G  0 part /

Here if we see that the block device xvda has 10 GB attached and having 1 partition with 7.9 GB for the root

  • Run the growpart command to increase the root partition (/)
# growpart /dev/xvda 1

The filesystem on /dev/xvda1 is now 18350080 blocks long.

  • Finally, increase the root partition with resize command
# resize2fs /dev/xvda1
resize2fs 1.42.3
   Filesystem at /dev/xvda1 is mounted on /; on-line resizing required
    old_desc_blocks = 1, new_desc_blocks = 5
    Performing an on-line resize of /dev/xvda1 to 18350080 (4k) blocks.
    The filesystem on /dev/xvda1 is now 18350080 blocks long.
  • Now if we check the disk space using df, we can observe the disk space has been increased to a size we have extended on the AWS.
# df -h
Filesystem            Size  Used Avail Use% Mounted on
/dev/xvda1            10G  7.1M  2.9G  69% /
tmpfs                 1.9G     0  1.9G   0% /dev/shm

Have a Question?